Captivate Build User Guide v3.0

1.Preface
1.1.Captivate Build
This document describes the features of Captivate Build 3.0. You access Captivate Build at https://captivate.clincapture.com using a web browser. For a list of supported web browsers, consult the Supported Browsers section.
1.2.Target Audience
This document is intended for study administrators who will use Captivate Build to design and build studies.
1.3.Document Organization
After the Getting Started section, the Building and Managing Studies section walks you step-by-step to build a study.
Information is provided at the end of the document to explain where to get help, sign up for free training and how to view FAQs for answers to commonly asked questions.
1.4.Typographical Conventions
| Sample | Description |
|---|---|
| User Roles | Blue, underlined font indicates a hyperlink inside this document, or on the web. |
| Forgot Password | Light blue, underlined font indicates a hyperlink in the Captivate Build application. |
| Submit | Bold font indicates verbatim text from Captivate Build, often used to identify a button, icon, text or field. |
| Home | Italics font indicates a webpage, document name, or provides emphasis. |
1.5.Supported Browsers
The following Internet browsers are supported to access Captivate Build:
- Microsoft Edge
- Mozilla Firefox
- Google Chrome versions 30 and above
- Apple Safari versions 6 and above
1.6.Referencing the Captivate System
If you used Captivate to capture data for your study, you can reference it as follows:
“Data collection and management for this study was performed using Captivate, version 3.0.”
2.Getting Started
Captivate Build provides a comprehensive set of features to build and manage clinical studies, including:
- Creating studies
- Building essential the components of a study: forms, events, groups, rules, sites and users
- Promoting changes from test to production
- Sharing a study with others
- And more!
Captivate Build Features Overview by Module
| Module | Features |
|---|---|
| Study |
Pre-requisite: An account must be created before you can create studies. |
| Forms |
Pre-requisite: A study must be created before you can create forms. |
| Events |
Pre-requisite: A study must be deployed before you can create events. |
| Groups |
Pre-requisite: A study must be deployed before you can create groups. |
| Rules |
Pre-requisite: Events configured with forms must be created before you can create rules. |
| Sites |
Pre-requisite: A study must be deployed before you can create sites. |
| Users |
Pre-requisite: A study must be deployed before you can create users. |
| Promote |
Pre-requisite: A study must be built and tested in your test environment before you can promote changes. |
| Libraries |
Pre-requisite: Forms must exist before they can be accessed in Libraries. |
| Help |
|
2.1.Create an Account
To create an account in Captivate Build:
- Point a supported browser at: http://captivate.clincapture.com
- From the login page below, click Create an account.
- Complete the following form. Required fields are marked with a red asterisk.
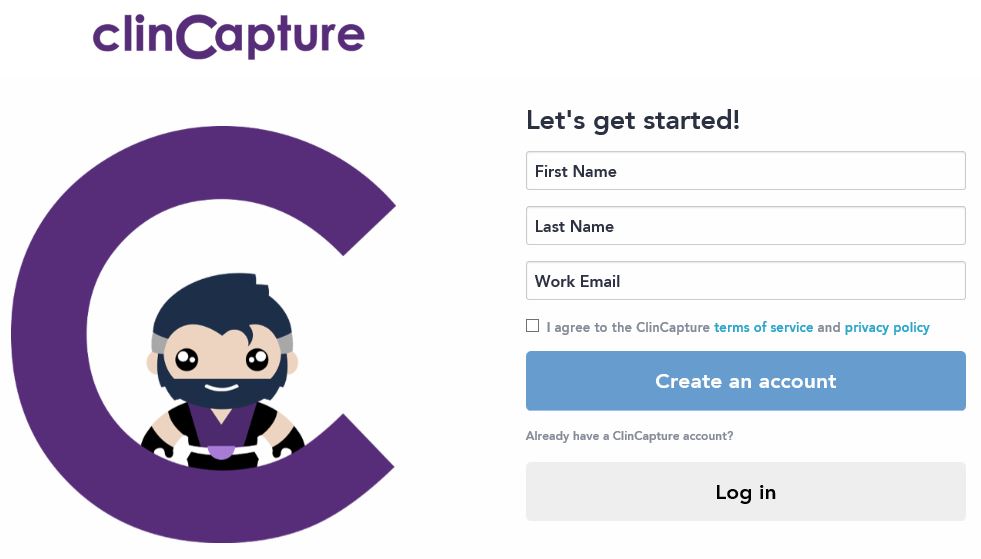
| Field | Description |
|---|---|
| First Name * | Type your first name. |
| Last Name * | Type your last name. |
| Work Email * | Type a valid corporate email address. Personal emails are not accepted. |
- Read the ClinCapture terms of service and privacy policies. They can be printed if needed.
- Check the box I agree to the clincapture terms of service and privacy policy.
- Click Create an account.
- Check your email inbox. You will receive a registration confirmation email from ClinCapture. This email contains a link to activate your account.
- Click the Activate Account link in your registration email.
- Complete your profile. Required fields are marked with a red asterisk.
| Login Information | |
|---|---|
| Username * | Captivate Build will suggest a unique username. It can be changed, if necessary. |
| Password * | Enter a password with at least 8 characters. |
| Re-enter Password * | Re-enter the same password. |
| Personal Information | |
| First Name * | This field is populated from your registration form. It can be changed, if necessary. |
| Last Name * | This field is populated from your registration form. It can be changed, if necessary. |
| Primary Email * | This field is populated from your registration form. It cannot be changed. |
| Job Title * | Enter your job title. |
| Business Information | |
| Company * | Your company name. |
| International Phone Number * | Enter a telephone number where you can be reached directly. The following character types are allowed: Numbers, Space, Parentheses ( ), and Dash -. Phone extensions are not supported. A valid phone number is required to verify your account. We will send you a PIN code, either via SMS or voice message, to validate the phone number. |
| Address Line 1 | Your business address. |
| Address Line 2 | A second line is provided for your business address, if necessary. |
| City | The city in which your business is located. |
| State / Province / Region | The state/province/region in which your business is located. |
| ZIP / Postal Code | The ZIP or postal code for your business. |
| Country | The country in which your business is located. |
| Time Zone | Select your time zone. |
- Click Submit.
- Your account is activated upon a successful save.
To update an existing profile:
- Login Captivate.
- Click the > icon next to your email in the Header.
- Click Update Profile. The user profile page opens.
- Make the necessary changes.
- Click Submit.
2.2.Login and Logout
You will need valid login credentials to use Captivate Build.
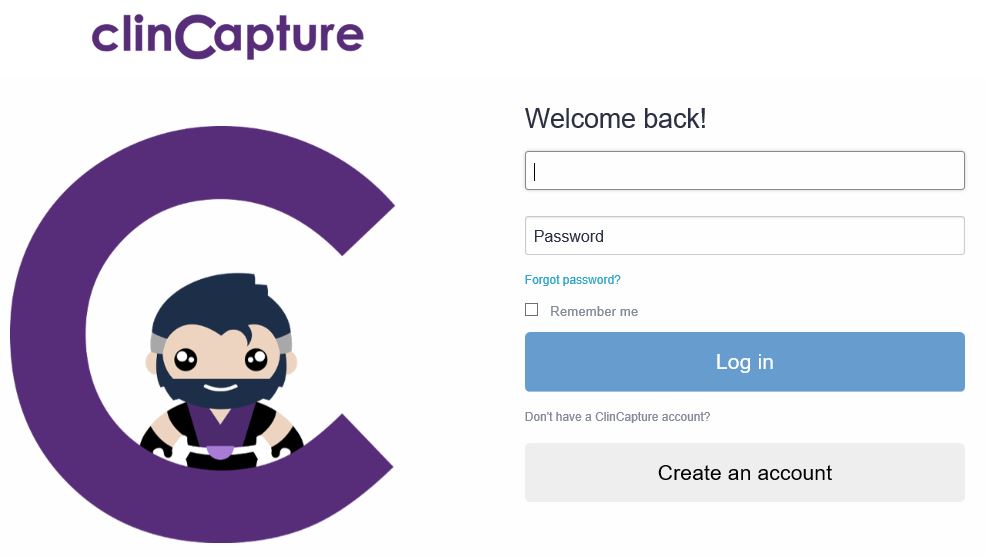
To log in to Captivate:
- Point your browser to https://captivate.clincapture.com.
- From the login screen, type your email and password.
- Click Log in.
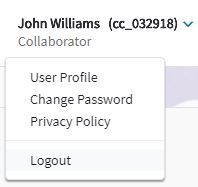
To log out of Captivate Build:
- Hover over your username in the header and select Logout.
2.3.Password Reset and Recovery
To reset your password:
- Login Captivate.
- Click the > icon next to your email in the Header.
- Click Password Reset.
- Enter your current password, then your new password twice.
- Click Submit.
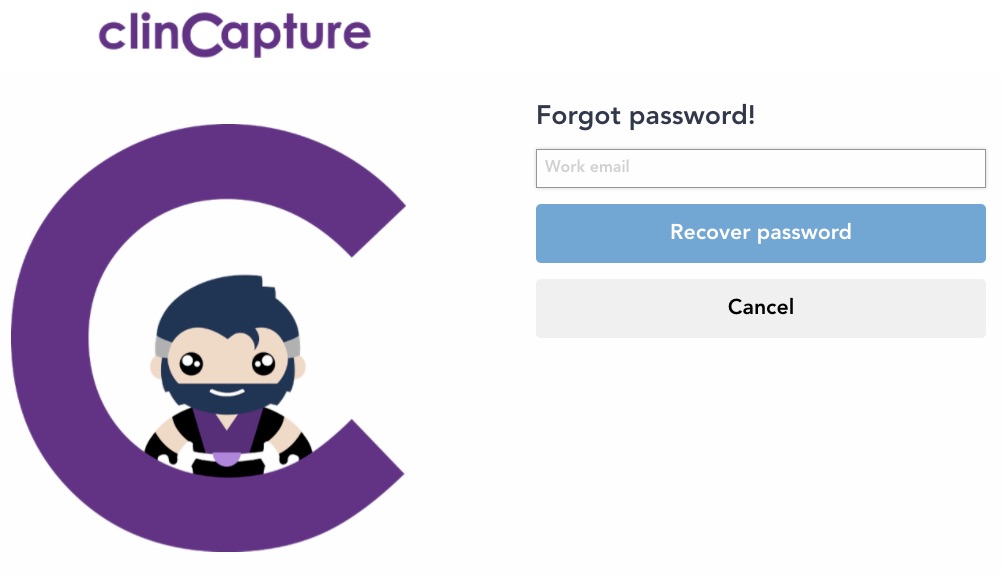
To recover your password:
- Click the Forgot Password? link on the login page.
- Enter your email address in the next screen and click Recover password.
- An email containing a link to create a new password will be sent to you.
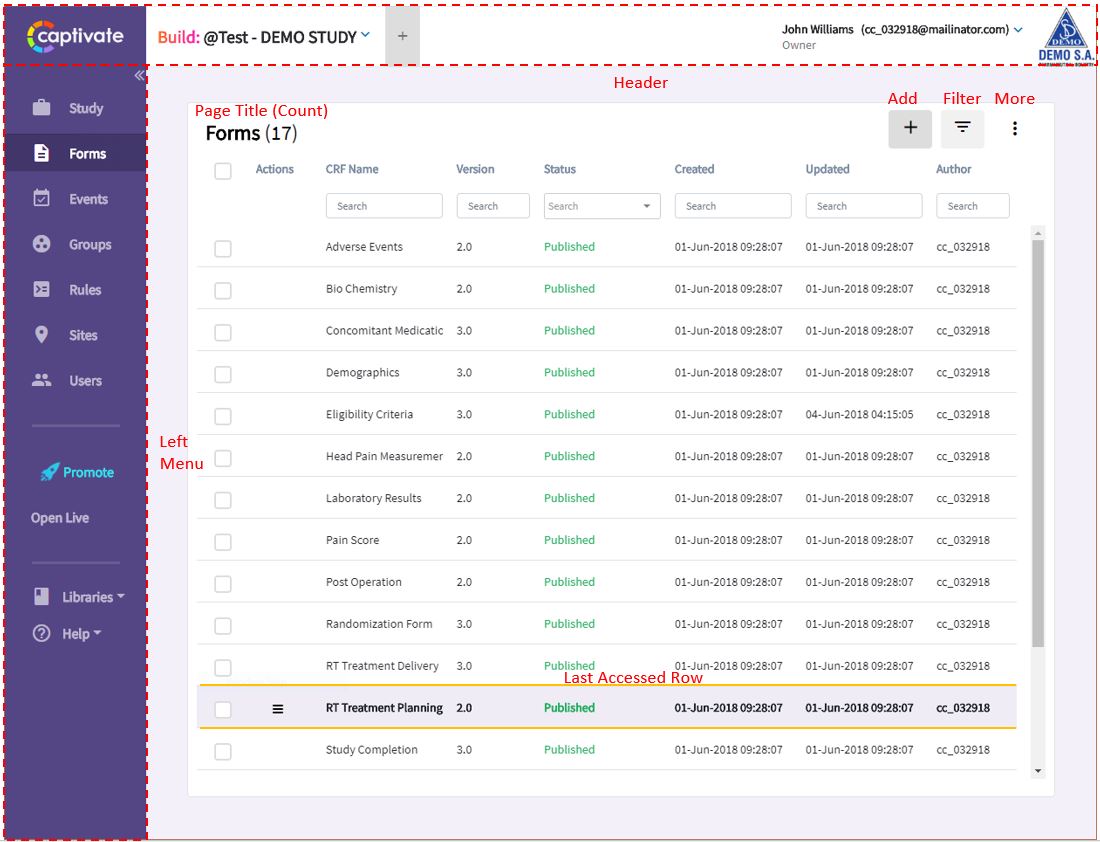
2.4.GUI Overview
Captivate features a modern and friendly user interface. Many study build tasks can be accomplished using an intuitive drag-and-drop GUI, such as designing forms and rules, ordering events, etc.
A typical Captivate page includes the following components:
- Header to select a study to build, add a study, manage your account and upload your logo.
- Left Menu to select a study component to build, such as forms, rules, sites, users, etc. You can also promote the changes to production, launch Captivate Live, access the form libraries and get help. The Left Menu can be collapsed to increase the main page area.
- List pages include a title, a row counter, and icons to: add a component, show/hide filters and a More Menu to take additional actions. The More Menu always include the ability to display More Columns and Export the filtered list.
- Last Access Row marker highlights the last row that was accessed.
A sample list page is shown below.
Note:
- Some pages support mass action on multiple rows.
- To perform a mass actions , check the box on the desired rows then click the Actions icon. Only the actions valid for the selected rows will be enabled.
- You can select/deselect all the rows by checking the box under the page title.
2.5.Resuming a Session
After a period of inactivity, Captivate Build prompts you to keep the session active. If you do not respond, your session will time-out and you will be logged out.
If you were designing a form when the session timed out, when you return, you are given the option to resume your previous session or start a new one.
If you decide to resume your session, you will be returned to the form design page from where the session timed out. Otherwise, you will be prompted to select a new study and your previous session will be terminated.
Note:
- You can resume a timed-out session on a different browser or even a different location.
3.Building and Managing Studies
This section walks you step-by-step to build and manage your studies, but first let’s examine the Captivate study operational model.
Captivate Study Operational Model
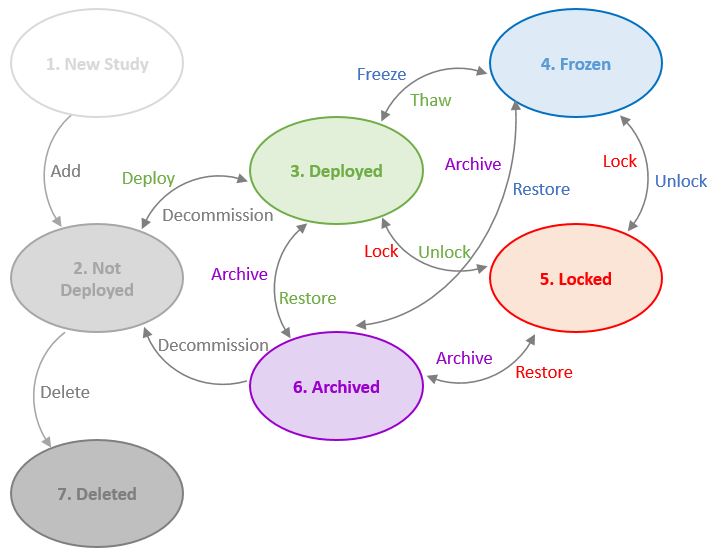
- Once added, a New Study starts in the Not Deployed state
- A study in the Not Deployed state can be either deleted or deployed
- A Deleted study is no longer accessible
- A study in the Deployed state can be:
- Frozen
- Archived
- Locked
- Decommissioned to be returned to the Not Deployed state
- A study in the Frozen state can be:
- Locked
- Archived
- Thawed to be returned to the Deployed state
- A study in the Locked state can be:
- Unlocked to be returned to the Deployed or Frozen state
- Archived
- A Study in the Archived state can be:
- Restored to be returned to its original state: Deployed, Locked or Frozen
- Decommissioned to be returned to the Not Deployed state
Notes:
- A study can be Shared and Cloned in any operational state.
- A study is Decommissioned only upon request to Support.
- When a study is Decommissioned, its forms are returned to the draft state.
3.1.Study
To manage studies:
- From the Left menu, click Study, or select another study in the Captivate Build header.
- A similar page is displayed.
- Select an action to be performed from the More Menu.
The following actions can be performed on Study, depending on its state.
| Study State | Action |
|---|---|
| Any |
|
| Not Deployed |
|
| Deployed |
|
| Frozen |
|
| Locked |
|
| Archived |
|
3.1.1.Add Study
Build Steps
To add a study:
- Click the + icon in the header.

- Complete the Study Properties. Watermarks are provided to help you determine the types of data you should enter. All fields are required and are marked with a red asterisk.
| Field | Description |
|---|---|
| Study Name* | Type a name for your study, using up to 91 characters. |
| Expected Study Start Date* | Select the start date for your study from the drop-down calendar. |
| Unique Protocol ID* | Type a unique protocol ID for your study. |
| Protocol Type* | Select a protocol type from the drop-down list. |
| Expected Enrollment* | Type the expected enrollment number, using up to 10 characters. Note: This number is for informational purposes only, and can be exceeded as necessary. |
| Principal Investigator* | Type the name of the principal investigator for the study, using up to 100 characters. |
| Brief Summary* | Type a brief summary of the purpose of the study, using up to 2000 characters. |
| Sponsor Name* | Type the sponsor name. The sponsor name is auto-populated from your profile’s company name. It can be changed as needed. |
| Study Type* | Select the study type from the drop-down list. |
| Select Study Plan* | Select the study plan from the drop-down list. See Plans and Pricing. |
| Therapeutic Area* | Select the therapeutic area related to your study from the drop-down list. |
| Features Add-On | Select the feature(s) you want to add to your study: Medical Coding, Randomization, ePro or eSource. Note: Additional setup fees may apply. |
- To create a study with the default options, click Submit.
- Click Continue to customize the study options.
| Option | Setting |
|---|---|
| Allow Discrepancy Management |
|
| Require Reason For Change |
|
| Allow SDV With Open Queries |
|
| Allow Dynamic Groups Management |
|
| Allow Discrepancy Correction Forms |
|
| Study Environment | This option designates the study environment. It is set automatically and cannot be changed.
|
| Message |
|
| How to Generate Subject ID |
|
| Prefix |
|
| Separator |
|
| Digits |
|
| Study Subject ID Label |
|
| Collect Secondary ID |
|
| Secondary ID Label |
|
| Secondary ID Label Viewable |
|
| Collect Date of Enrollment for Study |
|
| Date of Enrollment Study Label |
|
| Collect Gender |
|
| Gender Label |
|
| Collect Subject Date of Birth |
|
| Collect Person ID |
|
| Show Person ID on CRF Header |
|
| Collect Event Location |
|
| Collect Start Date |
|
| Collect Start Time |
|
| Start Date/Time Label |
|
| Collect Stop Date |
|
| Collect Stop Time |
|
| Stop Date/Time Label |
|
| Item-Level SDV Settings |
|
| Collect Interviewer Name |
|
| Interviewer Name Default |
|
| Collect Interview Date |
|
| Interviewer Date Default |
|
| Use autotabbing |
|
| Evaluate with context |
|
| SAS Name Annotation |
|
| Show Year in the Calendar |
|
| Assign Randomization Parameters to |
|
| Trial ID |
|
| CRF status after import |
|
| Auto-schedule event during import |
|
| Auto-create subject during import |
|
| Replace existing data if changed during import |
|
| Replace existing data per |
|
| Code with context |
|
| Auto-code Dictionary Name |
|
| Auto-scheduling for Insert Rules |
|
- Click Submit.
3.1.2.Edit Study
To edit an existing study:
- Click Study in the left menu to display the Study Info page.
- Click Edit.

- The study properties display. See Section Add Study for details. You can edit them as necessary.
Notes:
- Once a study is deployed, the Protocol Type cannot be edited.
- Plans cannot be downgraded. If a downgrade is required, contact your Sales representative
3.1.3.Delete Study
To delete an existing study:
-
- Click Study in the left menu to display the Study Info page
- From the More menu, select Delete.
- Click OK to confirm you want to permanently delete your study and associated forms.
- A confirmation message displays when your study has been successfully deleted.
Notes:
- The Study must not be deployed to delete it.
- Study deletion, including associated forms, cannot be recovered.
3.1.4.Authorize and Deploy Study
Build Steps:
Add a StudyAdd Forms- Deploy Study
- Publish Forms
- Add Events
- Add Groups
- Add Rules
- Add Sites
- Add Users
Before you can deploy for first study, you must establish a contract with a ClinCapture sales representative. If you are deploying a study on behalf of a sponsor, you must be authorized to do so.
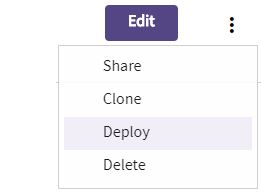
To deploy your study:
- Click Study in the left menu to display the Study Info page
- From the More menu, select Deploy or Authorize (if you are not yet authorized to deploy a study).
- Fill the required information.
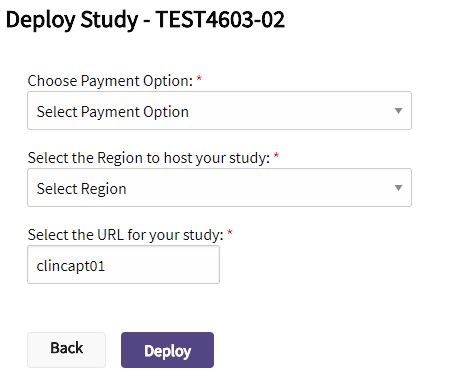
- Chose your payment option: Credit Card or Contract.
- Specify a unique URL for this study. The study URL is made up of two parts: the Region name and the Resource ID.
- The Region name depends on the region you selected, as follows:
- USA: https://us.clincapture.com/
- Europe: https://eu.clincapture.com/
- The resource ID defaults to the first eight characters of the Sponsor Name (excluding spaces and special characters). If necessary a sequence number will be used to make it unique. The resource ID can be edited, if necessary.
- The Region name depends on the region you selected, as follows:
For example, if you selected Europe for the Region and clincapt01 for the Resource ID, your study URL would be: https://eu-clincapture.com/clincapt01
- Click Deploy or Authorize if you are not authorized to deploy a study.
- The system will take about 3 to 5 minutes to provision your private Captivate server.
If you requested authorization to deploy a study:
- The Sponsor Owner will receive an email requesting the study deployment and she will be required to deploy your study.
- Once your study is deployed, you will be authorized to deploy additional studies for the same sponsor.
When a study is deployed, two identical study environments will be created in Captivate. The study name starting with @Test – allows you to build and test your study while the other will be used for production. For example, assuming your study name is DEMO STUDY, you will see two studies in Captivate:
- @Test – DEMO STUDY: Used to build and test your study
- DEMO STUDY: Used for production
You will be granted administrative access to both studies.
3.1.5.Clone Study
To clone a study:
- Click Study in the Left menu to display the Study Info page
- From the More menu, select Clone.
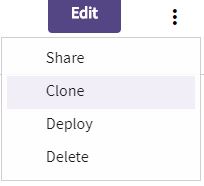
- The study properties display. See section Add Study for details. You can edit them as necessary.
- Click Clone.
Note:
- The study and associated forms will be cloned.
3.1.6.Freeze/Thaw Study
To freeze a deployed study:
- Click Study in the Left menu to display the Study Info page
- From the More menu, select Freeze.

- Click OK to confirm you want to freeze the study.
To thaw a frozen study:
- Click Study in the Left menu to display the Study Info page
- From the More menu, select Thaw.

- Click OK to confirm you want to thaw the study.
- Click OK to confirm you want to freeze the study.
Note:
- Studies must be deployed before they can be frozen/thawed.
3.1.7.Lock/Unlock Study
To lock a deployed or frozen study:
- Click Study in the Left menu to display the Study Info page
- From the More menu, select Lock.
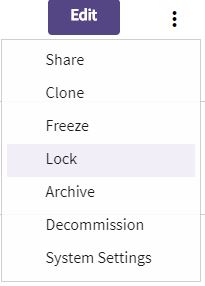
- Click OK to confirm you want to freeze the study.
To unlock a locked study:
- Click Study in the Left menu to display the Study Info page
- From the More menu, select Unlock.
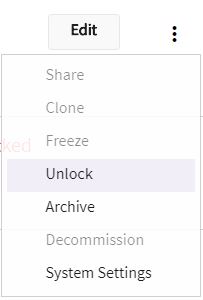
- Click OK to confirm you want to unlock the study.
Note:
- Studies must be deployed or frozen before they can be locked or unlocked.
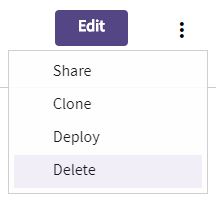
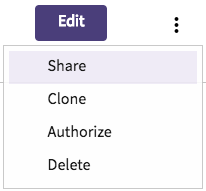
3.1.8.Share Study
To share an existing study:
- Click Study in the Left menu to display the Study Info page
- From the More menu, select Share
- Enter the email address of the person you want to share your study with.
- Select the Access Level you want to grant.
| Access Level | Description |
|---|---|
| Owner | This role allows you to delegate full ownership of your Study to another user. A delegated Owner can manage, edit, delete and re-share your study. You will still retain your original rights.If your study is shared as Owner, you can create additional studies for the same sponsor as the study being shared. |
| Collaborator | A Collaborator has read-write access to the forms. Assign this role if you need multiple users to work together creating and designing forms. |
| Viewer | A Viewer has read access to the forms. Assign this role to let a user to view your forms’ design. |
| Reviewer | A Reviewer has read access to the forms and can leave review comments in the Build Notes. The review comments are saved in an audit log and extracted with the form specifications. Assign this role to let a user to review your forms’ design. |
- Click Share.
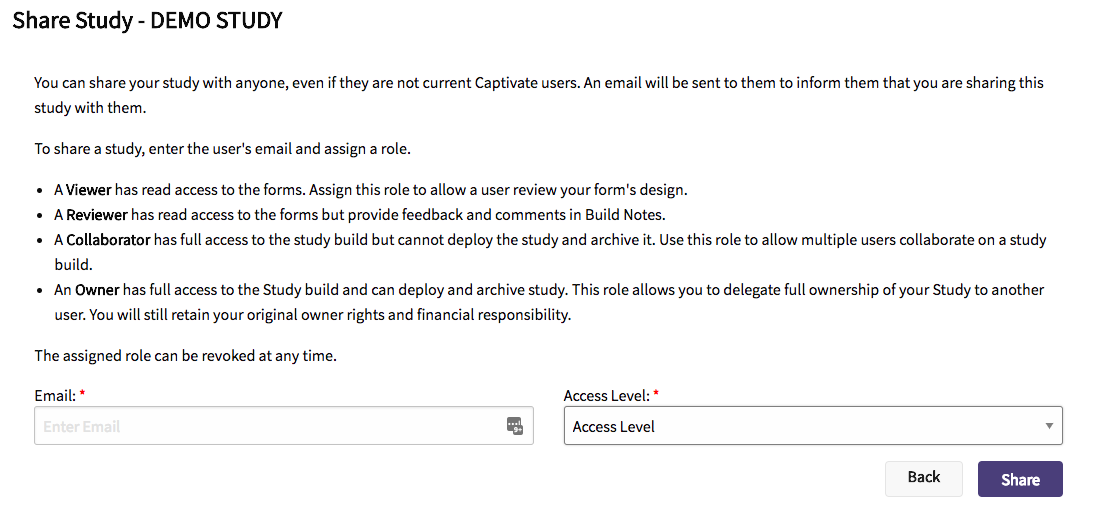
Notes:
- A study can be shared in any operational state.
- An email will be sent to inform the person you are sharing your study with them, which explains their access rights and provides a link to the study.
- This person does not have need to be a current user in the portal, however, they must register before they can access the shared study.
3.1.9.Archive Study
Archiving a study does not destroy data or the forms associated with it. Once a study is archived, it can be restored to its deployed state, until it is decommissioned.
When you archive a study, an email is sent to Sales who will contact you to discuss archiving options. All archiving options include receiving a compressed copy of your database . If necessary, your database copy should enable you to restore your study data. SAS datasets can also be provided upon request.
- Option 1 – Near-line forever: The study database will be kept near-line, allowing us to restore your study within 24-hours. This option includes a fee for archival and monthly storage. There is no limit to the retention period. There is no additional fee to restore the study.
- Option 2 – Archival: Your study database will be put offline and the system decommissioned. This option includes a fee for the archival process and an optional monthly fee for storage, should you require ClinCapture to store a copy of your database. Default retention period is 7 years, but additional retention time can be negotiated. Should you need to fully restore your study, a fee will be applied to restore your database.
- Option 3 – Backup for 8 weeks: If you do not require long term archival, your study data will be deleted and the system decommissioned. ClinCapture will keep a backup for 8 weeks, but not beyond. There is no archiving fee for this option. However, a fee will be applied to restore your study from our backup (within 8 weeks of the archive request) or from your electronic copy.
To archive a deployed study:
- Click Study in the Left menu to display the Study Info page
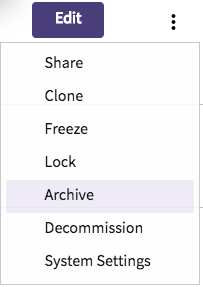
- From the More menu, select Archive.
- Click Archive Study to confirm you want to archive the study.
- The study state is now Deployed and Archived.
Note:
- A study state must be deployed, Locked or Frozen before it can be archived.
To restore an archived study:
- Click Study in the Left menu to display the Study Info page
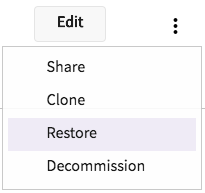
- From the More menu, select Restore.
- Click OK to confirm you want to restore the study.
- The previous study state will be restored.
3.1.10.Decommission Study
During decommissioning, the URL and the Captivate the web application that allows you to collect clinical trial data are deleted along with all clinical data associated with ALL the studies deployed in the same URL.
To decommission a study:
- Click Study in the Left menu to display the Study Info page
- From the More menu, select Decommission.
- Click OK to confirm you want to decommission the study.
Note:
- Study can only be decommissioned by ClinCapture staff, upon request.
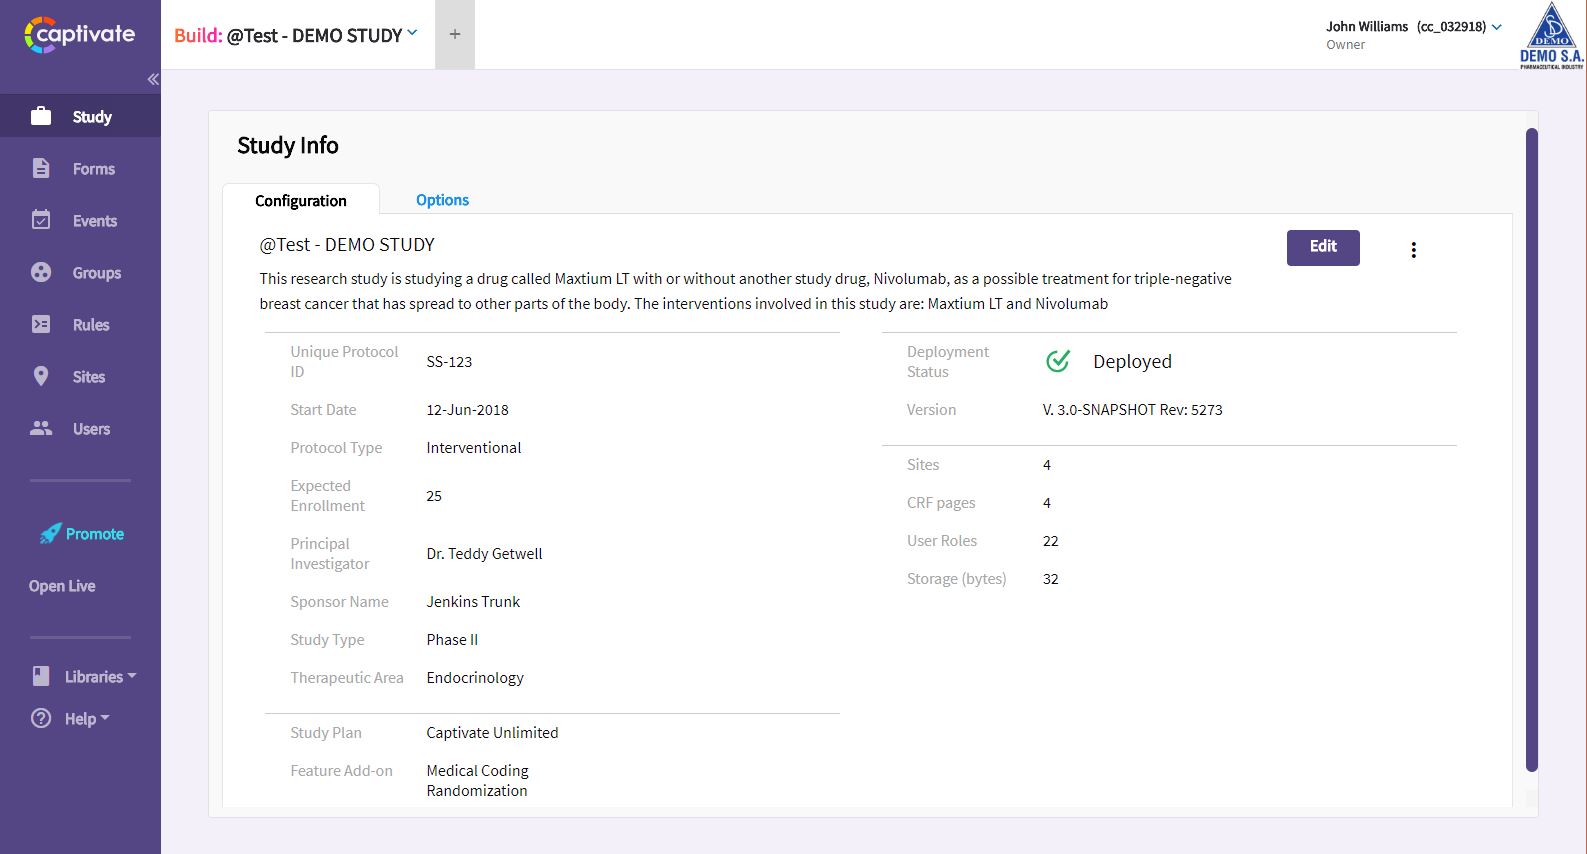
3.1.11.Monitor Usage
Study usage can be monitored , including: number of sites, number of form pages collected, number of user roles assigned to the study and the total storage used.
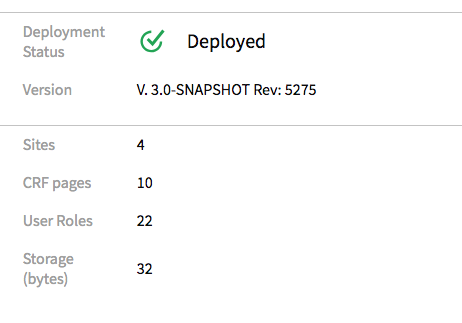
The Sites metric includes the number of sites in your study.
The CRF Pages metric includes the number of form pages where data entry was initiated or completed, including following states: “Initial Data Entry Started”, “Double Data Entry Started”, “Data Entry Completed”, “SDV-ed”, “Signed”, “Locked” and “Removed” (but not deleted). A form page is defined as a form section or Tab. Thus, multiple form pages may be contained within a single form.
The User Roles metric includes all user roles defined in Captivate that are assigned to the study. Please note that if a person has many roles in different studies, the different roles are counted in this metric. However, if a user account has access to multiple sites within a study, it will count as one role.
The Storage metric includes data entered in the forms, form attachments and data imported or exported (and not deleted from the application). Please note that the storage related to the study configuration is not included.
Notes:
- Size thresholds depend upon your study plan. See Plans and Pricing for details.
- Usage metrics are updated once a day.
- When one of the metrics exceeds the size threshold (for example 11 sites in the Captivate Light plan), you will receive an email about this event and may be contacted by a Sales representative to discuss your needs.
- Metrics monitoring has evolved over time:
- Studies created after 01-Sep-2017 – Only site metrics are applicable. Captivate Light has up to 10 sites and Captivate Standard up to 25 sites. The Captivate Global plan has unlimited sites.
- Studies created after 01-Apr-2017 , before 01-Sep-2017 – Only site metrics are applicable to the ClinCapture plans (up to 10 sites and up to 20 sites). The Captivate plan has unlimited sites.
- Studies created after 01-Oct-2016, before 1-Apr-2017 – Usage metrics are calculated your production studies only.
- Studies created before 01-Oct-2016 – Usage metrics aggregate the total usage for your development and production studies.
3.1.12.System Settings
System settings are available for:
- System
- Extracts
- Import
- Security
- Facility
- Reporting
- Randomization
- Medical Coding
- Job Server
Notes:
- System settings are globally applied to a Captivate server and may affect multiple studies. Contact Support if you are unsure about what study maybe affected.
- Some settings affect the hosting environment and may not be editable.
To configure system settings:
- Click Study in the Left menu to display the Study Info page
- From the More menu, select System Settings.
- Edit the following system settings as required.
| Setting Type | Description |
|---|---|
| System | Access:
These settings control the hosting environment and cannot be edited.
Repository:
This setting control the hosting environment related to user file storage and cannot be edited.
File Management: These settings control the FILE item feature and, unless otherwise specified, cannot be edited.
Logging: These settings control the hosting environment related to logging and, unless otherwise specified, cannot be edited.
Job Scheduler: These settings configure the quartz job scheduler, including the misfire threshold, the number of extract jobs that can run at a single time and their priority. Do not edit these settings unless instructed by Support.
Usage Statistics:
Usage statistics refers to information sent back to ClinCapture to help us improve captivate. This includes technical information such as the installed version, the number of studies created and the number of users using the system. These statistics DO NOT include information such as study or CRF names, study data, or user information. We collect this data in aggregate and use it according to our Privacy Policy to improve our products and services. Unless specified, these settings cannot not be edited.
Color Themes:
Languages:
|
| Extract |
These settings control the hosting environment related to extracts and, unless otherwise specified, cannot be edited.
|
| Imports |
These settings control the Data Import feature. However, these settings can be overridden at study level under Study -> Edit.
|
|
These settings configure the email interface. SMTP and SMTPS protocols are supported. If the host requires a username and password make sure Authentication is set to true. Minimum connection timeout is 5 seconds.
|
|
| Security | General:
LDAP: These settings control the hosting environment related to user authentication and the first LDAP entry cannot be edited.
|
| Facility |
These facility settings are used by default when creating a new study. Modified settings are not propagated to existing existing studies.
Facility:
Facility Contact:
|
| Reporting | This setting configures the URL to access the graphical reporting module based on Pentaho. This setting is deprecated,
|
| Randomization | These settings configure access to the randomization feature. Unless otherwise specified, these settings affect the hosting environment related to randomization and cannot be edited.
|
| Medical Coding |
These settings configure access to the medical coding feature. Unless otherwise specified, these settings affect the hosting environment related to medical coding and cannot be edited.
|
| Job Server |
These settings configure access to the Job Server to process batch type requests, such as data extracts, change promotion and casebooks. These settings affect the hosting environment related to batch processing and cannot be edited.
|
3.2.Forms
To manage forms:
- From the Left menu, click Forms.
- A similar page is displayed.
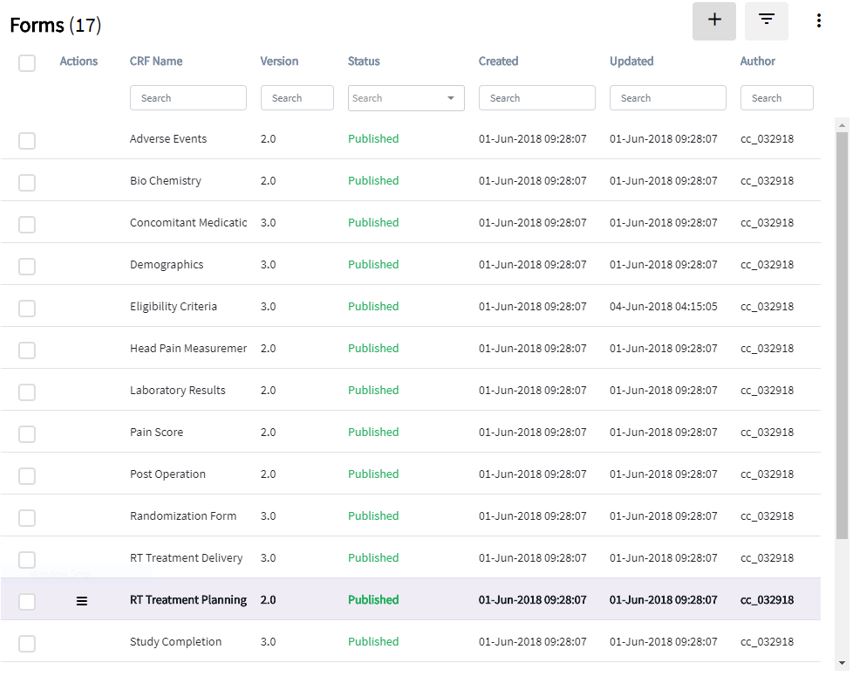
- Click the Actions icon to select the action to be performed.
The following actions can be performed on Forms, depending on their state:
| Form State | Action |
|---|---|
| Any |
|
| Draft |
|
| Published |
|
The More Menu includes:
- More Columns displays: Form OID, Version OID, SAS Naming, Require Labels, Build Notes, Description, and Comments.
- Import Form uploads a CRF compatible with Captivate (or OpenClinica) format in Excel. Various CRF templates are available upon request to help you design your CRF in Excel, including Randomization and Medical Coding forms. The Instruction tab in these templates provides direction to create your CRF in Excel.
- Export exports the filtered forms list.
Notes:
- Click the checkbox under the Forms title to select all or none of the forms displayed.
- You can filter the forms by CRF Name, Version, Status, Created date, Updated date, or Author. Simply start typing in one of the filter boxes. The list will filter to include those matching the entered characters. To re-display the whole list, remove the characters in the filter boxes.
- Click the column headers to sort the list in ascending or descending order.
- If multiple form versions exist, click the triangle icon in the version field to show/hide the version details.
- Click several checkboxes to apply a mass action: Publish, Clone, Unpublish or Delete. Only actions that are valid for the selected forms are available. For example, if all the forms selected are already published, then only the Unpublish and Clone actions will be available.
3.2.1.Add Form
Build Steps:
To add a form:
- Click Forms in the left menu
- Click the + icon in the Forms page.
- Complete the form configuration. All fields are editable and required fields are marked with a red asterisk.
| Field | Description |
|---|---|
| Form Type | Select Normal or Randomization. The Randomization type form allows you define stratification variables and randomize subjects. |
| Enforce SAS naming restrictions | If the form data is expected to be manipulated in SAS, click the Enforce SAS naming convention checkbox. This will enforce the SAS 9.2 naming conventions for the form name, the CRF Item Name, the Table Name, the Reporting Label and the Option Names and Values as follows:
|
| Form Name * | The form name. The form name can be changed at anytime. |
| Version * | Enter a major version identifier for the form. It can be a number or a text string, for example “test”. The system will add .0 (a minor identifier) to your version identifier. It will increment the minor version identifier, for example .1, .2, .3, etc., as you iterate publishing and editing the form. Older form versions can be deleted, as long as they are not linked to clinical data or rules. |
| Brief Description * | A description of the form, using up to 2000 characters. |
| Comments * | Any informational comments you wish to add. |
- Click Continue to configure the form options.
- Configure the form options These options control the behavior and display of the following parameters in the configuration panel.
| Field | Description |
|---|---|
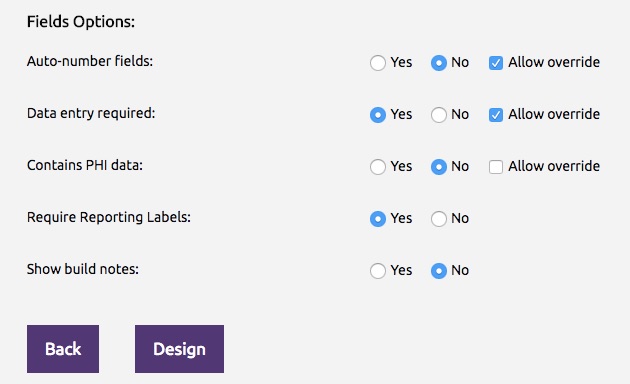
| Auto-number fields | Select Yes if the form contains auto-numbered items, or select No if the form does not contain auto-numbered items. Note: Check the box Allow override to allow the default value to be changed while designing the form. |
| Data entry required | Select Yes if data entry is required for all the items on this form, or select No if data entry is not required. Note: Check the box Allow override to allow the default value to be changed while designing the form. |
| Contains PHI data | Select Yes if the form contains Protected Health Information (PHI) data, or select No if the form does not contain PHI data. Note: Check the box Allow override to allow the default value to be changed while designing the form. |
| Require Reporting Labels | Select Yes if a reporting label is required for all items in your form, or select No if reporting label is not required. |
| Show build notes | Select Yes if build notes should be shown in the form designer, or select No if build notes should not be shown. |
- Click Design.
- The form designer opens. See Design Form.
- When you are finished designing your form, click Save & Exit.
Repeat this process until all the forms required in your study protocol have been created.
3.2.2.Design Form
The form designer offers a simple yet powerful GUI to create all forms required in a clinical trial. It’s unique What-You-See-Is-What-You-Get (WYSIWYG) GUI allow you to visualize exactly how a form will look in Captivate Live, while designing it.
To design an existing form:
- Click Forms in the Left Menu.
- Locate the relevant form in the list, if necessary using the filtering and sorting features.
- Click the Actions icon, then from the dropdown, click Design.
There are many ways you can organize and design your forms layout simply by using drag and drop features. Refer to the images and guide below, using the numbers as a cross-reference.
| Ref # | GUI Action | Result |
|---|---|---|
| 1 | Click tab | Toggles view between Form Studio and Form Library |
| 2 | Click or drag tool | Adds the item at the end of the form |
| 3 | Click form tab | Opens the page configuration panel |
| Drag form tab | Relocates the page in a different order | |
| Click the + icon | Creates a new page | |
| 4 | Click the
<…> icon |
Opens a new tab with the form specifications.
The specifications can be exported to Excel for review and submission. |
| 5 | CTL-C and CTL-V | Copies and pastes an item. This icon indicates the copy buffer is ready to be pasted. |
6 |
Drag from Left Text | Cursor is: |
| Drag from the shaded area’s right edge | Cursor is: |
|
| Click anywhere | Opens a panel to configure the area highlighted in yellow. | |
| 7 | Drag from Right Text | Cursor is: |
| Drag from the shaded area’s right edge | Cursor is: |
|
| Click anywhere | Opens a panel to configure the area highlighted in yellow. | |
| 8 | Indicates that an item has skip logic or is referenced by skip logic. | |
| 9 | Click and drag the column header on a table or grid | Cursor is: |
| 10 | Drag from the blue control bar | Cursor is: |
| Click the + icon | Adds a column to the right inside a table or grid.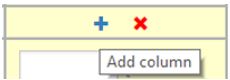 |
|
| 11 | Click the x icon | Deletes a column from a table or grid.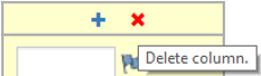 |
| 12 | Drag column dividers | Cursor is: |
| 13 | Drag the right edge of a grid or a table | Cursor is: |
| 14 | Red border | Highlights inconsistent items.
Inconsistent items must be fixed before the form can be saved. For example when you copy and paste an item, it will be inconsistent because it has a duplicate item name. You can also create inconsistent items using the library, for example copying am item with a duplicate option label, or referencing an option label that does not exist, etc. |
3.2.2.1.Form Layout
A form can be organized in several pages to group information to be collected. For example, a Screening form may include Inclusion, Exclusion and Demographics pages. This allows the collection of logically related data within the same form. When you first open the form designer, one page is provided for you by default, but you can add additional pages, as necessary. Sample page:
To configure a page:
- Position your mouse on the form tab. The entire page will be highlighted in yellow.
- Click the page tab.
- Complete the following:
| Field | Description |
|---|---|
| Page name | Enter a unique page name. The page name is displayed in the tab at the top of the form. The page name can be clicked to access different page. If no page name is entered, Form Studio uses Page name by default and numbers pages sequentially. For example: Page name 1, Page name 2, etc. |
| Title | Type the text that should appear as the page title on top of the form in a grey bar. By default, the page name is use if no title is provided. You can bold, italicize, underline, add superscript or subscript, and/or change the text’s color. Line breaks are permitted. |
| Subtitle | You can enter a subtitle for the section. The subtitle is displayed under the form title in a grey bar.You can bold, italicize, underline, add superscript or subscript, and/or change the text’s color. Line breaks are permitted. |
| Instructions | You can enter any instructions to the data entry person to fill out the form. Click the A to format the text. You can bold, italicize, underline, and/or change the text’s color. |
| Javascript | This field appears only if study plan is Captivate Light, Captivate Standard or Captivate Global. It allows programmers to extend the UI functionality by including JavaScripts. For example, the subject’s age can be automatically calculated in real time from the date of birth. Other computations such as complex scores and sophisticated visual effects can also programmed; for example highlighting the area clicked on an image. However, JavaScript programming is beyond the scope of user guide. Please contact support for available Javascript samples. |
- Click the + sign to add more pages if desired.

Notes:
- All items must be deleted first before you can delete a page.
- A page must contain at least one item before you can save it.
- Title, Subtitle and Instructions accept a subset of HTML elements, if additional visual effects are necessary.
3.2.2.2.Form Items
A form item is typically composed of a Left Text, input field and Right Text. However, some exceptions exist for certain items such as divider, grid, table, etc.

You design a form:
- To add an item to your form, simply click or drag and drop the item type you want to add to the form’s workspace. You can add any combination of the following item types.
| Field Type | Description |
|---|---|
 |
A text item. The user will type text data directly into a field. |
 |
A number item. The user will type numerical data directly into a field. Integer and decimal numbers can be specified. |
 |
A calculation item. Will display the result of a calculation, rather than requiring data entry. |
 |
A list item. Users will select options from a drop-down list. |
 |
A radio button item. Users will select an option by clicking a button. |
 |
A checkbox item. Users will select options by clicking checkboxes. |
 |
A date item. |
 |
A time item. |
 |
A file item. You can attach a file with this item. |
 |
A table item. Users will fill out data in table format. Rows can optionally be labeled. |
 |
A grid item. You can organize questions in a grid format, which allows more than one question to display in the same row. |
 |
A medical coding item. Note: This option is available if you selected Medical Coding as an add-on for the study. |
 |
A randomization item. Note: This option is available if you selected Randomization as an add-on for the study. |
 |
A visual divider. You can add a divider to visually separate sections of questions on the form. A divider must always be followed by one or more questions. Dividers cannot be followed by a table, or any items containing a Header. |
|
A visual divider. You can add a divider to visually separate sections of questions on the form. A divider must always be followed by one or more questions. Dividers cannot be followed by a table, or any items containing a Header. |
|
A visual divider. You can add a divider to visually separate sections of questions on the form. A divider must always be followed by one or more questions. Dividers cannot be followed by a table, or any items containing a Header. |
- After you add an item onto the form’s workspace, the next step is to define its properties. To do so, hover your mouse over the item. When it is highlighted, click your mouse to open the configuration panel.
- The actual pop-up you see depends upon the item type you added and the browser you are using. Refer to the images and guide below, using the numbers as a cross-reference.
| Ref # | Description |
|---|---|
| 1 | Configuration panel for the Text item. Hover your mouse to reveal the item name. |
| 2 | Click the red x to delete the item from the form. |
| Click the counter clock-wise blue arrow to revert the item back to its previously saved state. |
|
| Click the green check mark to save the item configuration and close the configuration panel. Note that you can click outside the configuration panel to perform the same action. | |
| 3 and 4 | A Rich Text Editor is provided for special font effects. |
| 5 | Item specific configuration settings |
| 6 | Advanced Settings |
- Complete the item configuration. Detailed information about the properties for each item type is provided below.
- You can relocate any item on the form by clicking the Right Text and dragging it up or down the form’s workspace, to its new position.
- If necessary, input fields can be dragged to the right, closer to the Left Text, or the form margin if there is no Left Text. See Form Designer for details
- You can also relocate a column in Table and Grid items by clicking on the header and dragging it to its new location. Make sure the area is highlighted in yellow before releasing the mouse, as it may take a few seconds on large tables.
- You can copy an item by hovering your mouse over the item to highlight it, then using standard CTRL-C/CTRL-V keyboard shortcuts to copy and paste it. Pasting the item places it at the bottom of the form. You can then relocate the item as necessary.
- After you have added all necessary items to the form, click Save & Exit.
- You are returned to the Forms list from where you can publish the form once it is final.
3.2.2.2.1.Calculation Item
If you added a Calculation item, click on the right of the input field to define its properties in the configuration panel. Required properties are marked with a red asterisk. The following properties can be configured for Calculation. Click any property below to see its description:
- Auto Numbering
- Build Note
- Calculation Type (*)
- Field Size (*)
- Field Validation
- Group Calculation (*)
- Header
- Item Name
- Left Text
- PHI Data
- Reporting Label
- Required
- Right Text
- Skip Logic
- Source Data Verification
- Subheader
- Validation Message
(*) Item-specific configuration option.
3.2.2.2.2.Checkbox Item
If you added a Checkbox item, click on the right of the input field to define its properties in the configuration panel. Required properties are marked with a red asterisk. The following properties can be configured for Checkbox. Click any property below to see its description:
- Auto Numbering
- Build Note
- Default Option (*)
- Field Validation
- Item Name
- Header
- Layout (*)
- Left Text
- Option Label Define/Select (*)
- Options Name/Value (*)
- PHI Data
- Reporting Label
- Required
- Right Text
- Source Data Verification
- Skip Logic
- Subheader
- Validation Message
(*) Item-specific configuration option.
3.2.2.2.3.Date Item
If you added a Date item, click on the right of the input field to define its properties in the configuration panel. Required properties are marked with a red asterisk. The following properties can be configured for Date. Click any property below to see its description:
- Auto Numbering
- Build Note
- Field Validation
- Header
- Item Name
- Left Text
- Partial Date (*)
- PHI Data
- Reporting Label
- Required
- Right Text
- Skip Logic
- Subheader
- Validation Message
(*) Item-specific configuration option.
3.2.2.2.4.Divider Item
Dividers allow you to create sections within a page by assigning a header to a group of items. Dividers are not allowed to be followed by a table or any item containing a Header. The following properties can be configured for Divider. Click any property below to see its description.
- Name (*)
(*) Item-specific configuration option.
3.2.2.2.5.File Item
If you added a File item, click on the right of the input field to define its properties in the configuration panel. Required properties are marked with a red asterisk. The following properties can be configured for File. Click any property below to see its description:
3.2.2.2.6.Grid Item
Grids provide a way for you to organize the items into multiple columns, this displays more than one question on the same line.
To add a grid:
- Click or drag and drop the Grid item type to add it to the form’s workspace.
- A default grid is added at the bottom of the form’s workspace, which is comprised of one row and two columns.
- Click just outside the grid outline to specify the number of rows and columns you want to add to your grid. Note that a grid cannot contain less than two columns. Extraneous empty rows and columns will be removed when you save the form.
- Drag and drop any item into one of the spaces on the grid, except: grid, table, randomization and dividers items.
- You can resize the column widths by dragging the column dividers inside the column headers to the left or right. See Form Studio for details.
- Complete the properties configuration for the item type you added.
- The following properties can be configured for Grid. Click any property below to see its description:
(*) Item-specific configuration option.
Notes:
- Continue to drag and drop items and configure them until your grid is complete.
- You can relocate columns inside the grid by clicking and dragging the column blue control bar to its new location while keeping the mouse pressed down. See Form Studio for details.
- If needed, click the + icon to add another column to your grid. Or, click the x icon to delete a column from your grid.
3.2.2.2.7.List Item
If you added a List item, click on the right of the input field to define its properties in the configuration panel. Required properties are marked with a red asterisk. The following properties can be configured for List. Click any property below to see its description:
- Auto Numbering
- Build Note
- Default Option (*)
- Description
- Field Validation
- Header
- Item Name
- Left Text
- Multi-select (*)
- Option Label Define/Select (*)
- Options Name/Value (*)
- PHI Data
- Required
- Right Text
- Skip Logic
- Strata Error Message (*)
- Strata Variable (*)
- Subheader
- Validation Message
(*) Item-specific configuration option.
3.2.2.2.8.Medical Coding Item
Before you can assign medical codes to your verbatim items, you must contact ClinCapture to configure your access to the medical coding appliance. ClinCapture will also verify that you have a valid license for the ontology you need to access.
If you added a Medical Coding item, click on the right of the input field to define its properties in the configuration panel. Required properties are marked with a red asterisk. The following properties can be configured for Medical Coding. Click any property below to see its description:
- Auto Numbering
- Build Note
- Description
- Dictionary (*)
- Header
- Item Name
- Left Text
- Required
- Right Text
- Skip Logic
- Subheader
(*) Item-specific configuration option.
Note: The Medical Coding item is available only if you selected Medical Coding as an add-on for the study.
3.2.2.2.9.Number Item
If you added a Number item, click on the right of the input field to define its properties in the configuration panel. Required properties are marked with a red asterisk. The following properties can be configured for Number. Click any property below to see its description:
- Auto Numbering
- Build Note
- Default Value (*)
- Description
- Field Size (*)
- Field Validation
- Header
- Item Name
- Left Text
- Number Type (*)
- PHI Data
- Readonly
- Required
- Right Text
- Strata Error Message (*)
- Strata Variable (*)
- Skip Logic
- Subheader
- Validation Message
- Validation Type (*)
(*) Item-specific configuration option.
3.2.2.2.10.Radio Button Item
If you added a Radio Button item, click on the right of the input field to define its properties in the configuration panel. Required properties are marked with a red asterisk. The following properties can be configured for Radio Button. Click any property below to see its description:
- Auto Numbering
- Build Note
- Description
- Field Validation
- Header
- Item Name
- Layout (*)
- Left Text
- Option Label Define/Select (*)
- Options Name/Value (*)
- PHI Data
- Required
- Right Text
- Skip Logic
- Strata Error Message (*)
- Strata Variable (*)
- Subheader
- Validation Message
(*) Item-specific configuration option.
3.2.2.2.11.Randomization Item
Before you can randomize subjects, you must contact ClinCapture to configure the randomization scheme for your study. The following information is required:
- Randomization method: Simple or Block.
- Block size (if method is Block)
- Stratification variables (if any)
- Masking: Open, Blinded, Double-blinded
- Sites allowed to randomize.
Click on the right of the input field to define the Randomization item properties in the configuration panel. Required properties are marked with a red asterisk. The following properties can be configured for Randomization. Click any property below to see its description:
- Auto Numbering
- Build Note
- Description
- Header
- Item Name
- PHI Data
- Randomization Result Changes (*)
- Randomization Results Include (*)
- Skip Logic
- Subheader
(*) Item-specific configuration option.
Notes:
- The Randomize Subject button and two fields are added automatically: Randomization result and Randomization Date. You cannot change or remove them.
- In addition, if the Kit ID option was selected, this field will also be added to the form’s workspace.
- The Randomization item is available only when Randomization is selected as an add-on for the study.
3.2.2.2.12.Table Item
To add a table:
- Click or drag and drop the Table item type to add it to the form’s workspace.
- The first table column is automatically added for you.
- Drag and drop any of the items in the column. Make sure the drop location is highlighted in yellow before releasing the mouse. A new column will be inserted. Note that the following items cannot be dropped into a column: grid, table, dividers and randomization.
- Click the column header to configure the dropped item.
- Click and drag the column header to move a column to a different location on the table. Make sure the drop location is highlighted in yellow before releasing the mouse.
- You can resize the column widths by dragging the column dividers inside the column headers to the left or right.
- Click the + sign to add additional columns, if needed, and add items as previously described.
- Hover on the edge of the Table item to highlight the entire table, then click to define the Table item properties in the configuration panel. Required properties are marked with a red asterisk. The following properties can be configured for Table. Click any property below to see its description:
- Auto Numbering
- Build Note
- Table Name
- Header
- Label Rows (*)
- Max Rows (*)
- Min Rows (*)
(*) Item-specific configuration option.
3.2.2.2.13.Text Item
If you added a Text item, click on the right of the input field to define its properties in the configuration panel. Required properties are marked with a red asterisk. The following properties can be configured for Text. Click any property below to see its description:
- Auto Numbering
- Build Note
- Default Value (*)
- Description
- Field Size (*)
- Field Validation
- Header
- Item Name
- Left Text
- Min/Max Text Size (*)
- PHI Data
- Readonly (*)
- Required
- Resizable (*)
- Right Text
- Skip Logic
- Subheader
- Validation Message
(*) Item-specific configuration option.
3.2.2.2.14.Time Item
If you added a Time item, click on the right of the input field to define its properties in the configuration panel. Required properties are marked with a red asterisk. The following properties can be configured for Time. Click any property below to see its description:
- Auto Numbering
- Build Note
- Description
- Header
- Item Name
- Left Text
- PHI Data
- Readonly (*)
- Required
- Right Text
- Skip Logic
- Subheader
(*) Item-specific configuration option.
3.2.2.3.Item Properties
Refer to Form Items for a list of configurable properties supported by each item.
3.2.2.3.1.Auto Numbering
Select Yes to automatically number items as they are added to or re-positioned in the form. Parent questions are numbered with a sequential integer such as: 1. 2. 3. etc. Child questions and table columns are sequentially numbered with a letter, for example 1.a 1.b 1.c etc.
Select No to disable automatic question numbering. If necessary, you can type your own numbering scheme in the item’s Left Text.
3.2.2.3.2.Build Note
Allows users such as data managers to associate build notes to any item on a form. Such note may, for example, include an edit check specification for a field or provide a comment to the study builder.
Build notes are also used to store comments from users with Reviewer role. The comments are authenticated and timestamped. They cannot be deleted. In addition, the build notes are included in the form specifications. Here is sample interaction between a collaboraor and a reviewer.
3.2.2.3.3.Calculation Type
Enter the calculation that should be run. The calculation will be an expression that takes the inputs of items of type Number. Note that once a CRF is published, the calculation cannot be changed. If a different calculation is needed, you will need to change the name of the CRF item.
The calculation syntax is:
- func: ( argument operand argument )
-or-
- func: function( argument [, argument, … ] )
Where ‘argument’can be one or more of the following items:
- An item name inside the CRF
- A number
- A nested function.
‘Operand’ can be any mathematical operation: + – / *
‘function’ is one of the functions below:
| Operator | Calculation | Group calculation |
|---|---|---|
| sum | sum( arg1, arg2, … ) | sum( arg ) |
| avg | avg( arg1, arg2, … ) | avg( arg ) |
| min | min( arg1, arg2, … ) | min( arg ) |
| max | max( arg1, arg2, … ) | max( arg ) |
| median | median( arg1, arg2, … ) | median( arg ) |
| stdev | stdev( arg1, arg2, … ) | stdev( arg ) |
| pow | pow( arg, power ) | Not supported |
| decode | decode( arg, key-value pair(s), default ) | Not supported |
Examples:
pow() uses two arguments: a number and the power. For example pow( 2, 3 ) is 8. We can use 0.5 for the square-root, thus pow(25, 0.5) is 5.
We can calculate the absolute difference between Item1 and Item2, using: func: pow( pow( Item1 – Item2 , 2 ), 1/2). This functions first takes the power of 2 of the difference between Item1 and Item2 and then takes the square-root, resulting in the absolute difference. decode() uses 3 arguments: a variable to evaluate, one or more key-value pairs, a default.
Let’s say you want to enter a temperature in either Fahrenheit or Celsius but store the temperature in Celsius, regardless of the unit chosen. You will need the following items in your CRF:
- Temp, a Number field to enter the temperature.
- Unit, a List or Radio Button field with 2 temperature unit options: F to indicate Fahrenheit and C for Celsius.
- Result, a Calculation field to store the temperature in Celsius, regardless of the temperature unit selected.
In our example, arg is Unit. If the Unit argument equals C, then we will store the value of item Temp as-is in the Result field. We will use the Fahrenheit conversion as the default, thus we will subtract 32 and then multiply it by 5/9. Therefore, our decode function is: func: decode( Unit, C, Temp,((Temp-32)*5/9)).
Note that the calculation is performed when the CRF is saved. However, instant calculations can be performed with the onchange() function with arguments of an item name (the trigger item) and value.
3.2.2.3.4.Columns
Number of columns configured in the grid when it is initially displayed. Columns number can be added by clicking on the ‘+’ icon or deleted by clicking on the trash icon in the column header. Unused right-most columns are truncated when the CRF is saved. Unused columns are not allowed in the middle of the grid.
3.2.2.3.5.Default Option
If a default value should display for this question on the CRF, select it from the drop-down list. The default value will be saved to the database if the user does not enter anything prior to saving the CRF.
3.2.2.3.6.Default Value
If a default value should display for this question on the CRF, enter it here. The default value will be saved to the database if the user does not enter anything prior to saving the CRF.
3.2.2.3.7.Group Calculation
Performs a calculation using variables entered in a table format.
- Select Yes to perform a tabular calculation.
- Select No to perform a non-tabular calculation.
3.2.2.3.8.Reporting Label
Description or definition of the CRF item that is used for reporting in SAS or other BI tools. This information is not shown on the CRF. If SAS naming restrictions are enforced, the Reporting Labels can be up to 40 alphanumeric characters, including spaces. Reporting Labels must be unique within a CRF.
3.2.2.3.9.Dictionary
Select a medical coding dictionary from the drop-down list. Once a CRF is published, the Dictionary cannot be changed.
3.2.2.3.10.Field Size
Allows to control the size of the input field. This configuration option is only displayed if a validation is specified for a CRF item.
3.2.2.3.11.Field Validation
To run an edit check at the time of data entry, enter a validation expression. The validation will run when the user saves the CRF. If an expression is specified, you will be required to enter a failed validation message to be displayed when the data does not pass validation. The validation must be between 1 and 2000 characters should be of the format:Expression-Type: Expression
The following two expression types are supported:
- regexp: /regular expression/ Regular expression is a Java-style expression. For more information, see: https://regex101.com/#javascript
This example requires a three-letter string (all uppercase): regexp: /[A-Z]{3}/
- func: operator(argument)
Argument can be either a hard coded number or an item name inside the CRF. Operators currently supported include:
| Function | Formula |
|---|---|
| Equal | eq(arg) |
| Not equal | ne(arg) |
| Greater than | gt(arg) |
| Greater than or equal | gte(arg) |
| Less than | lt(arg) |
| Less than or equal | lte(arg) |
| Range | range(arg1, arg2) |
This example requires a number between 1 and 10: func: range(1, 10)
This example requires a number equal to CRF item name AGE: func: eq(AGE)
Notes:
- Use Rules Studio for more complex rules or cross-forms edit checks.
- This field is not used for a Date, File, or Medical Coding type items.
- For the Time item type, the proper field validation is already provided to ensure a properly 24-hour formatted time is entered. You cannot change this expression.
3.2.2.3.12.Header
Can be used as a replacement for left and right item text or as a replacement for instructions. You can use a subset of HTML elements in this field. You can bold, italicize, underline, add superscript or subscript, and/or change the text’s color using the Rich Text Editor. Line breaks are permitted.
Note: When headers are used in items inside a Grid, only the left most item header is displayed on the CRF.
3.2.2.3.13.Instructions
You can enter any instructions for the data entry person to fill out this section of the CRF. You can bold, italicize, underline, and/or change the text’s color.
3.2.2.3.14.Item Name
Uniquely identifies the variable name for the CRF item. CRF Item Name is used to manipulate the data item programmatically. To ensure compatibility with SAS, the item name length is 8 and must start with an alpha character. When the SAS naming restriction is not enforced, the item name length is 40. It must be composed of alphanumeric characters and underscores and may not contain any spaces.
Note:
If a previously-published CRF item is renamed, the effect to rename a CRF item is that the old item is deleted and a new item is created. If data was entered on the original version, and then on the new version, the same information is collected in two fields. When the data is extracted, the data collected in the two fields will need to be manually merged in SAS. Also when re-assigning a CRF old version to a new version, the data collected under the previous item name will be lost, as the item name no longer exists in the new version.
3.2.2.3.15.JavaScript
This field appears as a CRF Page property only if study plan is Captivate. It allows programmers to extend the CRF functionality by including JavaScripts. For example, the subject’s age can be automatically calculated from the date of birth. Other computations such as complex scores and sophisticated visual effects can also programmed; for example highlighting the area clicked on an image.
JavaScript programming is beyond the scope of user guide. Please contact support for available Javascript samples.
3.2.2.3.16.Label Rows
Select Yes if table rows should be labeled. You can edit the row labels on the table by clicking on them.Click Label 1 to specify a descriptive name for the first row, as well as the column header. Then continue to click each Row Label to specify a descriptive name for the each of the rows.
3.2.2.3.17.Layout
Select whether to display the options horizontally or vertically.
3.2.2.3.18.Left Text
Type the text that should appear to the left of the item on the CRF, using up to 4000 characters. You can use a subset of HTML elements in this field. You can bold, italicize, underline, add superscript or subscript, and/or change the text’s color using the Rich Text Editor. Line breaks are permitted.
Note: Left Text is not available if the CRF item is placed inside a table.
3.2.2.3.19.Max Rows
This property restricts users from adding rows beyond the specified number. However, this restriction works only if data are entered interactively through Captivate’s GUI. If data are imported from a file or sent through web services, all data will be allowed to import, even if the rows of data exceed the specified number.
3.2.2.3.20.Min Rows
Min rows specify how many blank rows should exist for the table upon initiation of data entry, or when printing a blank CRF from Captivate. A user can add more rows to the table, up to the Max rows and remove some of unused rows. In a labeled table, you can reduce the number of rows by changing this value. The reduction will cause rows to be deleted from the bottom of the table.
3.2.2.3.21.Min/Max Text Size
Specify the minimum and maximum number of characters the question answer is allowed to be. Max text size must be blank, equal to or greater than Min text size.
3.2.2.3.22.Multi-select
Select Yes to allow users to select multiple options from the list by pressing the Control or Shift keys.
3.2.2.3.23.Name
Type the text that should appear inside the section divider. You can bold, italicize, underline, add superscript or subscript, and/or change the text’s color. Line breaks are permitted.
3.2.2.3.24.Number Type
Specify whether the number should be an Integer or a Decimal. Real and float data types are considered decimals. Note that once a CRF is published, you cannot change the type of number you originally specified.
3.2.2.3.25.Option Label Define/Select
Specify an option label to quickly reuse the options set you define in another List item. The label must be unique, composed of alphanumeric characters and may not contain spaces. If you have previously defined an option label, you can select one from the drop-down list to reuse it in this question. The saved option names and values will automatically populate. Note that a single select list cannot reference an option label from a multi-select list.
3.2.2.3.26.Options Name/Value
Enter the names and values for the options to display in the list. Any character, including a comma can be used as an option name or value. One or more blanks are allowed for Option Name. Note that once a CRF is published, you can add new option names and values but you cannot change or delete published names and values.
3.2.2.3.27.Page Name
Enter a unique page name. The page name is displayed in the tab at the top of the CRF. The CRF page name can be clicked to access different page. If no page name is entered, Form Studio uses Page name by default and numbers pages sequentially. For example: Page name 1, Page name 2, etc.
3.2.2.3.28.Partial Date
Select Yes to allow users to enter a partial date if the full date is unknown. Note that once a CRF is published, you cannot change the type of date you originally specified.
3.2.2.3.29.PHI Data
Select Yes to flag the CRF item as Protected Health Information. PHI- protected data is not revealed to users with a study level role, such:
- Study Administrator
- Study Monitor (Site Monitor can read PHI data)
- Study Coder
- Study Evaluator
3.2.2.3.30.Randomization Result Changes
Select one of the following:
- Dynamic group
Automatically assigns the randomized subject to a treatment group. Dynamic Groups those names correspond to the randomization result must defined; for example “Radio Therapy”. See Adding Groups for details.
- Subject ID
Automatically changes the Subject ID to the randomization result.
- CRF item only
The randomization result is simply stored in the CRF.
3.2.2.3.31.Randomization Result Include
Select one of the following:
- Randomization ID
Returns a randomization ID.
- Randomization ID + Kit ID
Returns a randomization ID and a kit ID.
3.2.2.3.32.Readonly
Select Yes if the CRF item should be read-only in Captivate.
3.2.2.3.33.Required
Select Yes if the user is required to answer this question.
Note:
- If a field is required but is hidden by skip logic, data is not required to entered unless the field is shown.
3.2.2.3.34.Resizable
Select Yes to allow the user to adjust the size of the text box. This is very useful if a large amount of text must be entered.
3.2.2.3.35.Right Text
Type the text that should appear to the right of the input field on the CRF, using up to 2000 characters. Used to ask a question, specify a unit, or provide supporting instructions or other comments. You can use a subset of HTML elements in this field. You can bold, italicize, underline, add superscript or subscript, and/or change the text’s color using the Rich Text Editor. Line breaks are permitted.
Note: Right Text is stripped if the CRF item is placed inside a table.
3.2.2.3.36.Rows
Number of rows configured in the grid when it is initially displayed. Rows can be added or deleted. Deleted rows are removed from the bottom. Unused bottom rows are truncated when the CRF is saved. Unused rows are not allowed in the middle of the grid.
3.2.2.3.37.Skip Logic
You can use skip logic to dynamically show hidden items on a CRF.
- Select Show to show a question when the CRF is opened.
- Select Hide if the question should initially be hidden when the CRF is opened, then displayed based on a trigger condition you specify. If Hide is selected, additional configuration is needed to specify a trigger condition, including:
- The CRF item name is the name of a CRF item containing options. Only list, radio buttons and checkbox item names will be available in the dropdown menu.
- The Option name is the name of the option in the item specified above to trigger the display state change. It must be selected from the dropdown menu.
- The Error message is the error to be shown if the user triggers the display condition, enters information, then removes the triggering condition. For example, the user selects ‘Female’ for the subject’s gender, answers the pregnancy question then goes back and changes the subject’s gender to ‘Male’. The appropriate error message in this case would be, for example: “Do not answer pregnancy question if subject is male.”
Notes:
- If you enter data in a question that contains skip logic, the skip logic will be executed.
- If the data condition is met, the display status of the skip item will be changed.
- If the data condition is not met, the skip item is put in its initial display state.
- Questions that use skip logic are marked with an information icon. Hover your mouse over the icon to see this message.

-
If a field is required but is hidden by skip logic, data is not required to entered unless the field is shown.
3.2.2.3.38.Source Data Verification
Set to Yes if this specific item must be source data verified. Otherwise, set to No.
3.2.2.3.39.Strata Error Message
You must specify an error message to be displayed to the data entry person if the stratification variable is incorrect or missing.
3.2.2.3.40.Strata Variable
If you selected Randomization as an add-on for your study, you can designate this CRF item as a stratification variable. Note that the randomization scheme, including stratification variables, must be configured by ClinCapture before you can randomize subjects. See Randomization Item for details.
Note: Items marked as a strata variable cannot be modified or deleted once they are published.
- Select Yes to mark this CRF item as a stratification variable. Form Studio will also assign a special CRF item name to this field that cannot be edited.
- Select No and this CRF item is not used as a stratification variable.
Once a CRF is published, items configured as a stratification variable cannot be relocated or reconfigured.
3.2.2.3.41.Subheader
If you are using a Header for this item, you can specify a subheader. The subheader text displays underneath the Header, is separated by a line and has a grey background. You can use a subset of HTML elements in this field. You can bold, italicize, underline, add superscript or subscript, and/or change the text’s color using the Rich Text Editor. Line breaks are permitted.
The subheader must be 240 characters or less.
3.2.2.3.42.Subtitle
You can enter a subtitle for a CRF section. The subtitle is displayed under the CRF title in a grey bar. You can use a subset of HTML elements in this field. You can bold, italicize, underline, add superscript or subscript, and/or change the text’s color using the Rich Text Editor. Line breaks are permitted.
3.2.2.3.43.Table Name
Uniquely identifies the variable name for the Table item. Table name is used to manipulate the data item programmatically.
To ensure compatibility with SAS 9.2 naming, the Table item name length can be up to 8 characters and it must start with an alpha character or an underscore. Spaces and SAS reserved keywords are not allowed.
When the SAS naming restriction is not enforced, the item name length is 40. The name must be composed of alphanumeric characters and underscores and may not contain any spaces.
Note: Previously-published Table item cannot be renamed.
3.2.2.3.44.Title
Type the text that should appear as the page title on top of the CRF in a grey bar. By default, Form Studio uses Page Name if no title is provided. You can bold, italicize, underline, add superscript or subscript, and/or change the text’s color. Line breaks are permitted.
3.2.2.3.45.Validation Message
Specify a validation expression to run an edit check on this CRF item.
3.2.2.3.46.Validation Type
Select the validation type for a number field.
- None
No validation is used.
- Min/Max range
Specify the minimum and maximum values for the number. If the number is a decimal, the values specified in these properties must also be a decimal and meet the decimal size requirement.
- Enumerated values
Specify the valid enumerated values. The format should be a number followed by a vertical bar and a number (NUMBER|NUMBER). For example, if valid responses are 0, 1, and 9, you should enter 0|1|9.
3.2.2.4.Item Library
To design a CRF using items from CRFs in your User Library or the CDASH Library:
- To add one or more items to your CRF from either the User Library or the CDASH Library, first select the Library tab in Form Studio.
- Select My Library to use your user library, or select CDASH Library.
- The User Library lists all the CRFs used by the user (created or cloned). To additionally display CRFs from shared studies, check the Include Shared Studies box.
- Use the search drop-down lists to find CRFs from your library for a specific Sponsor or Study Name. Once you have made your selections, click Search. A similar table will be displayed.
- You can use the provided filters to filter the CRFs by CRF Name, Version, Status, Created date, Updated date, Author, Study or Sponsor. Simply start typing in one of the filter boxes. The list will filter to include those matching the entered characters. To re-display the whole list, remove the characters in the filter boxes. Click the up/down arrows to sort the list in ascending or descending order.
- You can view any of the CRFs in the list.
- The CRF opens in read-only format.
- Select the items you want to copy by clicking on the checkboxes next to them.
- Click the Copy button. You will be notified when the items have been successfully copied.
- If needed, continue copying items, possibly from another CRF.
- When you’re done, click the Form tab to return to your current CRF.
- The copied items should be added to your CRF; see considerations for copying items with skip logic and response labels below.
Notes:
- You can use the library to copy an entire page or section of a CRF. To copy a page, click the checkbox in the CRF tab. This will automatically select all the items. When you click the Form tab to return to your CRF, you have the option to copy the items to a new page in the CRF or the existing page.
- To copy a section, click the checkbox in the CRF divider. All questions up to the next divider or end of the CRF will be selected.
- You can reset, or un-copy, the CRF items prior to returning to the Form tab by clicking Reset.
- Items are not renamed during the copy operation. You can copy the same items multiple times but you must assign them unique item names before saving your CRF.
- The following must be considered when using the library to copy questions involved in skip logic. In the points below, the skip logic reference (the CRF item name used in the skip logic) is called the parent item. The items containing the Hide skip logic are called the children items.
- If a child item is selected, the parent item involved in the skip logic will be automatically selected. If the parent item is inside a grid, the entire grid will be selected.
- If after copying any items need to be fixed (for example, if there are duplicate item names or labels or a parent in skip logic is missing), they will be highlighted with a red border and must be fixed prior to saving the CRF.
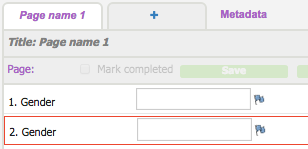
3.2.2.5.Form Specifications
To view, print or export the form specifications:
- Click the Specifications link at the top of the form.
- A page opens in a new tab that displays the specifications for the form.
- Click the Print or Export to Excel button to print the page or send the form specifications to Excel.
3.2.2.6.Form Libraries
ClinCapture Studio provides three CRF libraries to facilitate reuse and speed up study builds:
- My Forms, a user library containing CRFs created or cloned by a user, or CRFs from studies shared with a user.
- Company Standards, a corporate library of Studies and CRFs managed by the Standards Manager user. See Company Standards for details.
- Industry Standards, a global library of CRFs managed by ClinCapture. It include CRFs that conform to the CDASH standard and others.
3.2.2.6.1.My Forms
To access CRFs in My Forms library:
- From the left menu, click LIBRARIES.
- Select My Forms in the submenu.
- The CRFs contained in the library are listed.
- To display additional CRFs from shared studies, check the Include CRFs from shared studies box.
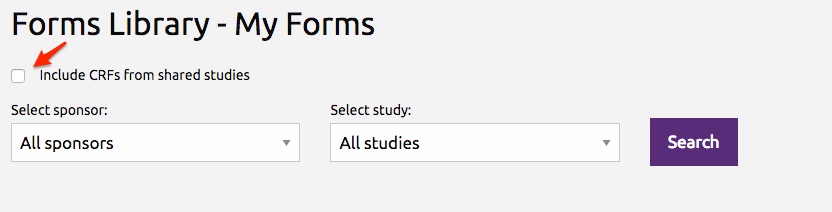
- Use the search drop-down lists to find CRFs from your library for a specific Sponsor, Study Name, and/or CRF Name. Once you have made your selections, click Search.
- Click More to display the Therapeutic Area and Comments associated with a specific CRF version.

- You can also use the provided filters to filter the CRFs by CRF Name, Sponsor, Therapeutic Area, Version, Comments Status, Created date, Updated date, or Author. Simply start typing in one of the filter boxes. The list will filter to include those matching the entered characters. To re-display the whole list, remove the characters in the filter boxes. Click the up/down arrows to sort the list in ascending or descending order.

- Click the CRF menu action and select View or Clone. View opens the CRF is read-only mode. To clone a CRF, see Cloning a CRF for details.
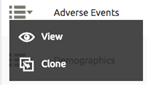
Notes:
- Mass action is possible by checking boxes, next to the action menu, to select multiple CRFs.
- Standards Managers can access all the forms developed in their organization when they check the Include CRFs from shared studies box.
3.2.2.6.2.Company Standards
Studio offers a very flexible mechanism to setup, manage and access a company-wide library containing standard studies and CRFs for certain therapeutic areas or study types.
3.2.2.6.2.1.Becoming a Standards Manager
To become a Standards Manager, you must contact Support to change your user role. The following features become available to you:
- You can create a study and include it in the company standards library. When a study is included in the company standards library, all of its CRFs will be included in the Company Standards library.
- You can view all the studies created within your organization, including those for different sponsors, if applicable.
- You can clone any CRF created in your organization from My Forms library into a standard study.
- if a CRF becomes obsolete it can be hidden from the company standards library, or versioned if the standards change.
3.2.2.6.2.2.Creating Company Standards
First, the Standards Manager must create a study and include it in the Company Standards library:
- From the left menu, navigate to STUDIES > Dashboard
- Click ADD NEW STUDY
- Fill the study details
- If the study does not contain CRFs specific to a therapeutic area, select Not Specified in the Therapeutic Area dropdown list

- Check the box Include study in Company Standards
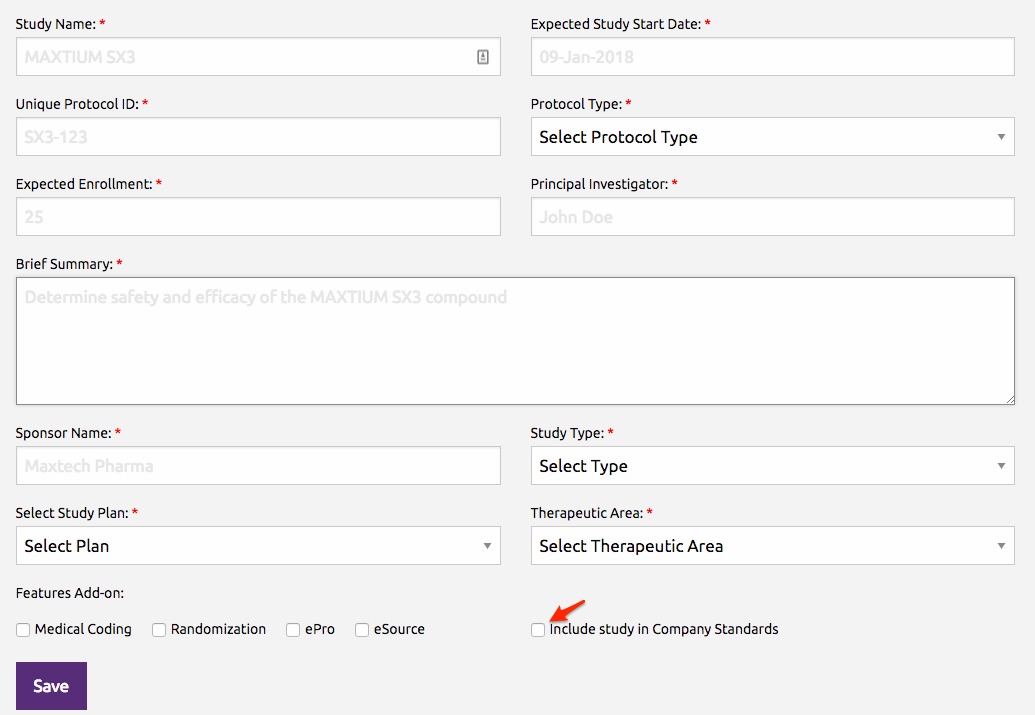
- Click Save.
If a study already exists:
- From the left menu, navigate to STUDIES > Dashboard
- Locate the study to be designated Company Standards
- From the study menu options, select Edit
- Check the box Include study in Company Standards
- Click Save.
Next, the CRFs to be included in the standard study must be created or cloned from other studies.
Notes:
- Many studies can be designated as Company Standards. For example, a Sponsor may have different standard studies for different therapeutic areas. A Clinical Research Organization may have different standards for different Sponsors, etc.
- Standards Managers can clone studies shared with them as Owner or Collaborator.
- The Standards Manager has read access to all CRFs created within his/her organization. In addition they can review these CRFs and create build notes for the study builder, for example to inquire about non-standard CRFs items.
3.2.2.6.2.3.Managing Company Standards
Standards Managers can add, delete, hide or assign a new version to CRFs belonging to Company Standards studies.
To add a CRF:
- New CRFs can be created from scratch.
- CRFs can be cloned from any other study created for a given organization, using My Forms library. They can then be optionally modified to adhere to a specific standard.
To delete a CRF:
- CRFs must unpublished, if previously published.
- Click Delete from the CRF menu option.
- The CRF is deleted from the CRF list in Form Studio.
To hide a CRF:
- Select Design from the CRF menu option.
- In Form Studio, check the box Hide form from Company Standards library.

- Click Save.
- The CRF is displayed in light grey font in the CRF list to indicate that it will be hidden from users accessing the Company Standards library.

To assign a new version to a CRF:
- Select Design from the CRF menu option.
- Make the necessary changes to the CRF in Form Studio.
- Click Save or Save&Exit
- Assign a new version and/or comments in the popup window, then click Update. Comments are version specific and are visible to users accessing the Company Standards library.
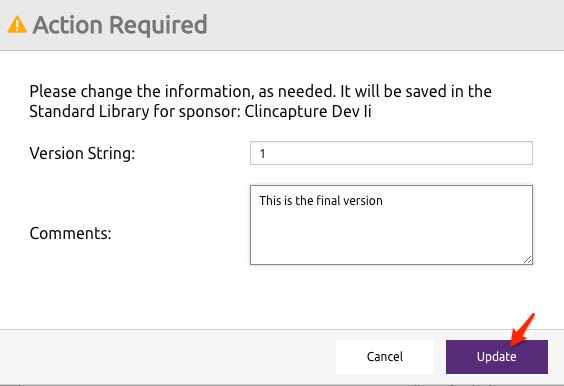
3.2.2.6.2.4.Using Company Standards
Any user within an organization has access to the Company Standards library. See Form Libraries for details.
3.2.2.6.3.Industry Standards
To access CRFs in My Forms library:
- From the left menu, click LIBRARIES.
- Select Industry Standards in the submenu.
- The CRFs contained in the library are listed.
- Click More to display the Therapeutic Area and Comments associated with a specific CRF version.
- You can also use the provided filters to filter the CRFs by CRF Name, Therapeutic Area, Version, Comments Status, Created date, Updated date, or Author. Simply start typing in one of the filter boxes. The list will filter to include those matching the entered characters. To re-display the whole list, remove the characters in the filter boxes. Click the up/down arrows to sort the list in ascending or descending order.
- Click the CRF menu action and select View or Clone. View opens the CRF is read-only mode. To clone a CRF, see Cloning a CRF for details.
Note:
- Mass action is possible by checking boxes, next to the action menu, to select multiple CRFs.
3.2.3.View Form
To view a form:
- Click Forms in the Left Menu.
- Locate the relevant form in the list, if necessary using the filtering and sorting features.
- Click the Actions icon, then from the dropdown, click View.
- The form opens in view mode. You can see the form but you cannot make any changes to it.
- When you’re done viewing the form, click Back.
3.2.4.Clone Form
To clone a single form within a study:
- Click Forms in the Left Menu.
- Locate the relevant form in the list, if necessary using the filtering and sorting features.
- Click the Actions icon, then from the dropdown, click Clone.
- A sequential number is appended to the CRF name to make it unique.
- Optionally, edit the form name, version, brief description and comments.
- The cloned form appears in the forms list.
To clone multiple CRFs within a study:
- Click Forms in the Left Menu.
- Locate all the relevant forms in the list, if necessary using the filtering and sorting features.
- Click the Actions icon, then from the dropdown, click Clone.
- A similar confirmation window is displayed.

- Click Clone.
- A sequential number is appended to the CRF names to make them unique.
- The cloned forms appear in the forms list.
To clone forms from Libraries:
- Click Libraries from the left menu.
- A submenu appears.
- Select the desired library to clone from:
- My Forms
- Company Standards
- Industry Standards.
- Locate the relevant form(s) to be cloned in the CRF table, if necessary using the filtering and sorting features.
- From the Action dropdown, click Clone.
- Select the destination study. By default, your current study will be selected but you can select another one, as needed.
- If a single form is cloned, you can edit the form name, version, brief description and comments, as needed.
- Click Clone.
3.2.5.Edit Form
To edit an existing form:
- Click Forms in the Left Menu.
- Locate the relevant form in the list, if necessary using the filtering and sorting features.
- Click the Actions icon, then from the dropdown, click Edit.
- Make any necessary changes to the CRF properties. Watermarks are provided to help you determine the types of data you should enter. Required fields are marked with a red asterisk.
| Field | Description |
|---|---|
| Form Type * | The form type is: Normal or Randomization. If you select Normal, the Randomization tool will not display in Form Studio. The Randomization form type is only available if it is selected as an add-on for the study. |
| Enforce SAS naming restrictions* | If the form data is expected to be manipulated in SAS, click the Enforce SAS naming convention checkbox. This will enforce the SAS 9.2 naming conventions for the form name, the CRF Item Name, the Table Name, the Reporting Label and the Option Names and Values as follows:
Note:
|
| CRF Name * | The CRF name. Note: Once published, a CRF name cannot be changed. Because you can share CRFs among studies for a given sponsor, CRF Names must be unique within sponsor. |
| Version * | Enter a version identifier for the CRF. It can be a number or a text string, for example “test”. Form Studio will add .0 to your version identifier. It will increment the minor version number, for example .1, .2, .3, etc., as you iterate publishing and editing the CRF. |
| Brief Description | A description of the CRF, using up to 2000 characters. |
| Comments | Any informational comments you wish to add. |
- Click Next to complete the Field Options. These options control the parameters that display on the configuration panel.
- Hover over the left option text to learn more about it.
- Set the option default value.
- These options will not be configurable in Form Studio unless you Allow override.
| Field | Description |
|---|---|
| Auto-number fields | Select Yes if the form contains auto-numbered items, or select No if the form does not contain auto-numbered items. Note: Check the box Allow override to allow the default value to be changed in Form Studio. |
| Data entry required | Select Yes if data entry is required for all the items on this form, or select No if data entry is not required. Note: Check the box Allow override to allow the default value to be changed in Form Studio. |
| Contains PHI data | Select Yes if the form contains Protected Health Information (PHI) data, or select No if the form does not contain PHI data. Note: Check the box Allow override to allow the default value to be changed in Form Studio. |
| Require reporting labels | Select Yes if a reporting label is required for all items in your CRF, or select No if reporting label is not required. |
| Show build notes | Select Yes if build notes should be shown for the form in Form Studio, or select No if build notes should not be shown. Note that if a study is shared with a Reviewer, the build notes will be enabled regardless of this setting. |
- Click Save.
3.2.6.Publish and Unpublish Form
Build Steps:
To publish a form:
- Click Forms in the Left Menu.
- Locate the relevant form in the list, if necessary using the filtering and sorting features.
- Click the Actions icon, then from the dropdown, click Publish.
- On the Publish Form page, you can set a different version; this is recommended to indicate your changes are significant. Then click Publish.
- A message will indicate whether or not the publish operation was successful.
If the form fails to publish, the following occurs:
- An email is sent, reporting that the form that failed to publish.
- The error from Captivate Live is displayed.
Note:
- You cannot change the form version using a mass publish action. In a mass publish action, the major version string is unchanged and the minor version will be incremented.
Once a form is published, it can be unpublished to remove it from Captivate Live. To unpublish a form:
- Click Forms in the Left Menu.
- Locate the relevant form in the list, if necessary using the filtering and sorting features.
- Click the Actions icon, then from the dropdown, click Unpublish.
- Click Unpublish again i the popup to confirm that you want to remove the form from Captivate Live.
- If the CRF has associated clinical data, a similar pop-up window is displayed. It gives you the option to Force Delete the clinical data, or keep it. This operation is not reversible. If you are unsure, click Keep Data.

- When the form is successfully unpublished, its status reverts to Draft.
3.2.7.Delete Form
To delete a form, its status must be Draft:
- Click Forms in the Left Menu.
- Locate the relevant form in the list, if necessary using the filtering and sorting features.
- Click the Actions icon, then from the dropdown, click Delete.
- Click Delete to confirm that you want to delete the form.
- The form is removed from the list.
Note:
- Delete is not a recoverable action.
3.2.8.View Form Details
To view form details, its status must be Published:
- Click Forms in the Left Menu.
- Locate the relevant form in the list, if necessary using the filtering and sorting features.
- Click the Actions icon, then from the dropdown, click View Details.
- A similar page open.
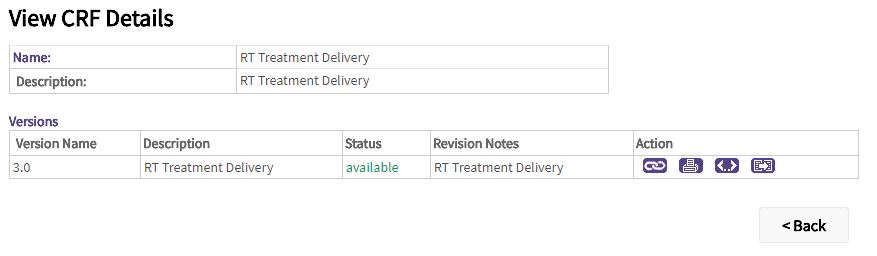
| Icon | Description |
|---|---|
| Links – Displays clinical data associated with the form, including discrepancy notes, rules, subjects and events. | |
| Print – Opens a new window displaying the form. Enter CTL-P to send the form to the printer | |
| Metadata – Displays the form, sections, groups and items metadata, including the relevant OIDs. | |
| Annotate – Display the annotated form. |
3.2.9.Lock and Unlock Form
Locking a form makes it unavailable for data entry or any other operations, except view. To lock a form, its status must be Published:
- Click Forms in the Left Menu.
- Locate the relevant form in the list, if necessary using the filtering and sorting features.
- Click the Actions icon, then from the dropdown, click Lock.
- Click Submit to confirm that you want to lock the form, or Back to cancel.
- Click Yes in the confirmation pop-up.
- The form is now locked.
Unlocking a form reverses its locked status. To unlock a form, its status must be Locked:
- Click Forms in the Left Menu.
- Locate the relevant form in the list, if necessary using the filtering and sorting features.
- Click the Actions icon, then from the dropdown, click Unlock.
- Click Submit to confirm that you want to enable the form, or Back to cancel.
- Click Yes in the confirmation pop-up.
- The form is now unlocked.
3.3.Events
To manage events:
- From the Left menu, click Events.
- A similar page is displayed.
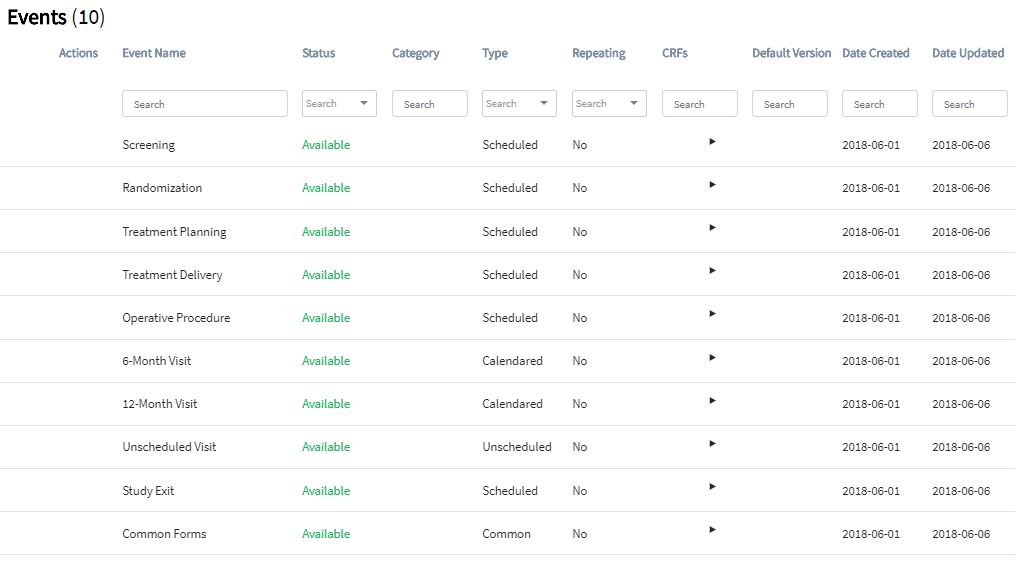
- Click the Actions icon to select the action to be performed.
The following actions can be performed on Events:
| Action | Description |
|---|---|
| View | Displays the event metadata. |
| Edit | Changes the event configuration, including event name, type, etc. |
| Disable
Enable |
Hides or restores the event in Captivate Live’s Subject Matrix. |
| Delete | Deletes the event from the study build. This action is not recoverable. |
The More Menu includes:
- More Columns displays: event OID, Description, Reference, Day Min, Day Schedule, Day Max, and Day Email.
- Export exports the filtered events list.
Notes:
- The events are listed by order of appearance on the Subject Matrix. For this reason, sorting is not available. To re-order an event, click the Relocate icon at the beginning of the row then drag and drop the event in the desired order. Make sure to collapse the CRF tree view before relocating an event.

- To reorder a form attached to an event, click the triangle icon in the CRFs column to expand the CRFs tree view. Click the Relocate icon at the beginning of the row then drag and drop the CRF in the desired order. Make sure to drop the CRF within the event it belongs to.
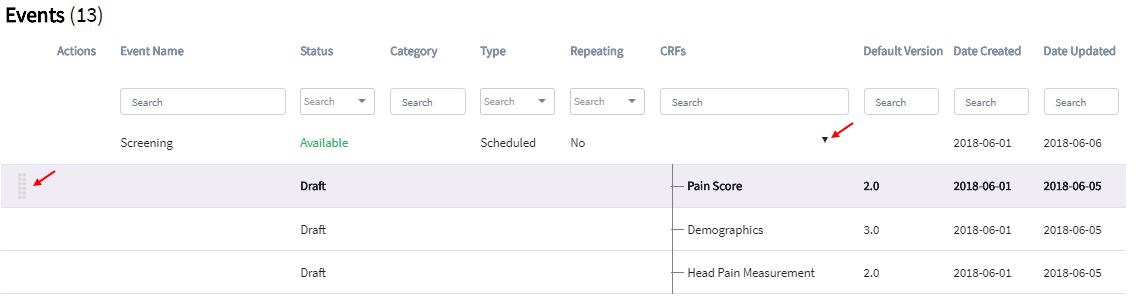
- To relocate a form between events, use Edit to delete the from from an event, then Edit the desired event to re-attach the CRF.
- You can filter the events list. The list will filter to include those matching the entered characters. To re-display the whole list, remove the characters in the filter boxes.
3.3.1.Add Event
Build Steps:
Add a StudyAdd FormsDeploy StudyPublish Forms- Add Events
- Add Groups
- Add Rules
- Add Sites
- Add Users
Events are a series of site visits or clinical events during which patient data is collected over the course of a study. There are four types of events:
- Scheduled events are expected to occur at a pre-determined schedule, according to the study protocol.
- Unscheduled events do not have a pre-determined schedule. For example, an unexpected office visit.
- eSource events are similar to Scheduled events, but they allow you to collect data in real time. You do not need to collect data on a source document first.
- Common events collect data forms, but they are not expected to be associated with a particular time. Examples might include Protocol Deviations, Concomitant Medications and Adverse Events.
- Calendared events automatically schedule follow-up events based on a reference event, according to intervals set in the study protocol.
Add an Event
- Click Events in the Left Menu
- Click the + icon in the Events page.
- Complete the following. Required fields are marked with an asterisk.
| Field | Description |
|---|---|
| Name * | The name of the event. |
| Description | The description of the event. |
| Type * | Select the event type from the dropdown list: eSource*, Scheduled, Unscheduled, Common, Calendared (see Calendared Events).
* Requires the eSource feature to be enabled. |
| Repeating | If you selected Scheduled, Unscheduled or Common as the event type, select Yes if the event is repeating.Repeating indicates this event can occur multiple times for a subject within the study. |
| Reference Event | If you selected Calendared, complete the following: Reference Event – Check the box if this event is a reference event.If this is not a reference event, complete the following:
|
| Category | Specify a category for the event. The category is generally used to indicate the study phase. For example, Screening, PreTreatment, Treatment, FollowUp. |
- Click Continue.
- Select the CRFs to attach to the event by clicking the corresponding checkboxes.
- Click Continue.
- For each of the selected CRFs, complete the following.
| Field | Description |
|---|---|
| Required | Check the box if the CRF must be completed for the event. |
| Data Entry Quality | Select:
|
| Password Required | Check the box if the user must enter their password to save the data for the CRF. |
| Default Version | If there are more than one version of the CRF, select the version from the dropdown that should default for the event. |
| Accept New CRF Versions For Sites | When this checkbox is checked and a new CRF version is available, sites can be automatically be updated. This function can be disabled on a per-site basis. |
| Hide CRF | Check the box if the CRF should only be viewable at the study level. If this option is selected, sites cannot access the CRF. |
| Source Data Verification | Select how much, if any, of the data on the CRF requires source data verification. You can select:
|
| Send Email when CRF is |
|
| Tabbing inside tables | To control the cursor movement when tabbing inside tables, select:
|
- Click Continue.
- Review the Event to be defined.
- If you’re satisfied, click Submit.
- You can change the order the events will appear on the Subject Matrix by dragging and dropping the events in the order desired.
- You can also change the order of the CRFs attached to an event by dragging and dropping a CRF in the order desired within the same event.
Repeat this process to create all the events with the associated forms, according to your study protocol.
Note:
- Event must be added after deploying a study.
3.3.2.Calendared Event
Create events that automatically schedule follow-up events based on a reference event, according to intervals set in the study protocol.
The workflow of Calendared Events is as follow:
- The baseline event is completed
- The other calendared events get scheduled automatically on the day scheduled, X day after the baseline is completed (Day Schedule)
- If you complete these events outside of the time frame (Day min / Day max), the calendar turns red and you need to answer a query
Create a Reference Event / Baseline
- Click Events in the Left Menu
- Click the + icon in the Events page.
- Complete the form. Required fields are marked with an asterisk.
- Click on “Yes” in the option for “Reference Event”
- Then Continue as you would do for any events (see Add Events)
Automatic Follow-up Events
We have to set up the follow-up events so they can be automatically scheduled once the Reference Event has been completed.
Create Calendared Events
- Click Events in the Left Menu
- Click the + icon in the Events page.
- Complete the form. Required fields are marked with an asterisk.
- For the Type, select “Calendared”
- Day Schedule: Sets when this event will be scheduled following a number of days after the completion of the Reference Day when.
- Time Frame:
Day Max: Maximum limit after the completion of the Reference Event. The current event has to be completed before this limit, otherwise, a discrepancy is fired.
Day Min: Minimum limit after the completion of the Reference Event. The current event has to be completed after this limit, otherwise, a discrepancy is fired.
For example:
Day Schedule = 7
Day Max = 10
Day Min = 5
Means the current calendared event is scheduled 7 days after the completion of the Reference Event. If the current calendared event is completed earlier than 5 days, or later than 10 days, a discrepancy is fired.
Day Schedule = 30
Day Max = 35
Day Min = 25
Means the current calendared event is scheduled 30 days after the completion of the Reference Event. If the current calendared event is completed earlier than 25 days, or later than 35 days, a discrepancy is fired.
etc.
3.3.3.View Event
To view an event:
- Click Events in the Left Menu.
- Locate the relevant form in the list, if necessary using the filtering feature.
- Click the Actions icon, then from the dropdown, click View.
- The event metadata page is displayed but you cannot make any changes to it.
- When you’re done viewing the event, click Back.
3.3.4.Edit Event
To edit an existing event:
- Click Events in the Left Menu.
- Locate the relevant event in the list, if necessary using the filtering feature.
- Click the Actions icon, then from the dropdown, click Edit.
- Make any necessary changes to the event properties. Required fields are marked with a red asterisk. See section Add Event for the configurable event properties.
3.3.5.Disable and Enable Event
Disabling an event removes it from Captivate Live’s Subject Matrix. To disable an event:
- Click Events in the Left Menu.
- Locate the relevant event in the list, if necessary using the filtering feature.
- Click the Actions icon, then from the dropdown, click Disable.
- Click Submit to confirm that you want to disable the event, or Back to cancel.
- Click Yes in the confirmation pop-up.
- The event is now disabled.
Note:
- To disable an event, its status must be published.
Enabling an event reverses its disabled status. To enable an event:
- Click Events in the Left Menu.
- Locate the relevant event in the list, if necessary using the filtering feature.
- Click the Actions icon, then from the dropdown, click Enable.
- Click Submit to confirm that you want to enable the event, or Back to cancel.
- Click Yes in the confirmation pop-up.
- The event is now available.
Note:
- To enable an event, its status must be Disabled.
3.3.6.Delete Event
To delete an event:
- Click Events in the Left Menu.
- Locate the relevant event in the list, if necessary using the filtering feature.
- Click the Actions icon, then from the dropdown, click Delete.
- Click Delete to confirm that you want to delete the event.
- The event is removed from the list.
Note:
- Before deleting an event, the following conditions must be met:
- The event does not have any forms attached. Edit the event to delete any associated forms.
- All events status must be not scheduled in Captivate’s Subject Matrix.
- Delete is not a recoverable action.
3.4.Groups
To manage groups:
- From the Left menu, click Groups.
- A similar page is displayed.
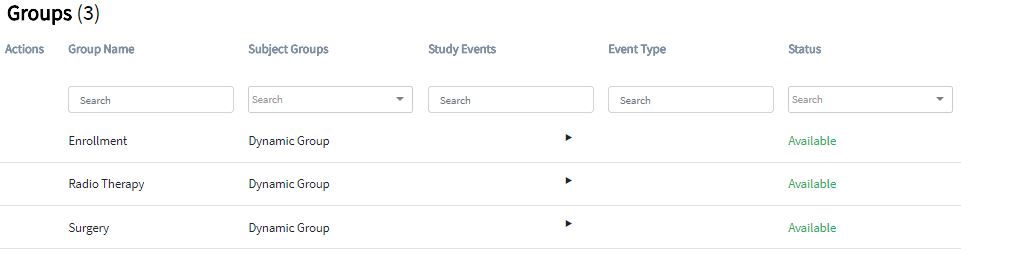
- Click the Actions icon to select the action to be performed.
The following actions can be performed on Groups:
| Action | Description |
|---|---|
| View | Displays the group metadata. |
| Edit | Changes the group configuration, including group name, type, etc. |
| Disable
Enable |
Removes or restores the group. |
| Delete | Deletes the group from the study build. This action is not recoverable. |
The More Menu includes:
- More Columns displays: Subject Assignment and Default.
- Export exports the filtered groups list.
Notes:
- For group details, click the black triangle icon to expand the groups’ tree view.
- You can filter the groups list. The list will filter to include those matching the entered characters. To re-display the whole list, remove the characters in the filter boxes.
3.4.1.Add Group
Build Steps:
To add a group:
- Click Groups in the left menu
- Click the + icon in the Groups page.
- Complete the following. Required fields are marked with an asterisk.
| Field | Description |
|---|---|
| Name * | The name of the subject group class. |
| Type * | Select the group type from the dropdown list:
|
|
If you selected Arm, Family/Pedigree, Demographic or Other, complete the following: |
|
| Subject Assignment * | Specify whether the subject assignment is Required or Optional. |
| Study GroupsName/Description | Enter the names and descriptions of the desired study groups. |
|
If you selected Dynamic Group, complete the following: |
|
| Default | Check the box if this dynamic group should be the default. The default dynamic group can be used to automatically assign to the subject when it is created. |
| Study Events * | Check the events to assign to the dynamic group.
Notes:
|
- Click Continue.
- Review the Subject Group Class to be defined.
- If you’re satisfied, click Submit.
Notes:
- Events associated with Dynamic Groups are shown on the left side of the Subject Matrix, starting with the group marked as the Default.
- You can reorder the events within a Dynamic Group by clicking the up/down triangles.
3.4.2.View Group
To view a group:
- Click Groups in the Left Menu.
- Locate the relevant group in the list, if necessary using the filtering and sorting features.
- Click the Actions icon, then from the dropdown, click View.
- The group metadata page is displayed but you cannot make any changes to it.
- When you’re done viewing the group, click Back.
3.4.3.Edit Group
To edit a group:
- Click Groups in the Left Menu.
- Locate the relevant group in the list, if necessary using the filtering and sorting features.
- Click the Actions icon, then from the dropdown, click Edit.
- Make any necessary changes to the group properties. Required fields are marked with a red asterisk. See section Add Group for the configurable properties.
- When you’re done editing the group, click Submit.
3.4.4.Disable and Enable Group
Disabling a group removes it from Captivate Live’s Subject Matrix. To disable a group:
- Click Groups in the Left Menu.
- Locate the relevant group in the list, if necessary using the filtering and sorting features.
- Click the Actions icon, then from the dropdown, click Disable.
- Click Submit to confirm that you want to disable the group, or Back to cancel.
- Click Yes in the confirmation pop-up.
- The group is now disabled.
Note:
- To disable a group, its status must be Available.
Enabling a group reverses its disabled status. To enable a group:
- Click Groups in the Left Menu.
- Locate the relevant group in the list, if necessary using the filtering feature.
- Click the Actions icon, then from the dropdown, click Enable.
- Click Submit to confirm that you want to enable the group, or Back to cancel.
- Click Yes in the confirmation pop-up.
- The group status is now Available.
Note:
- To enable a group, its status must be Disabled.
3.4.5.Delete Group
To delete a group:
- Click Groups in the Left Menu.
- Locate the relevant group in the list, if necessary using the filtering and sorting features.
- Click the Actions icon, then from the dropdown, click Delete.
- Click Delete to confirm that you want to delete the group.
- The group is removed from the list.
Note:
- When a group is deleted, all subjects assignment to the group is permanently removed.
- Delete is not a recoverable action.
3.5.Rules
To manage rules:
- From the Left menu, click Rules.
- A similar page is displayed.
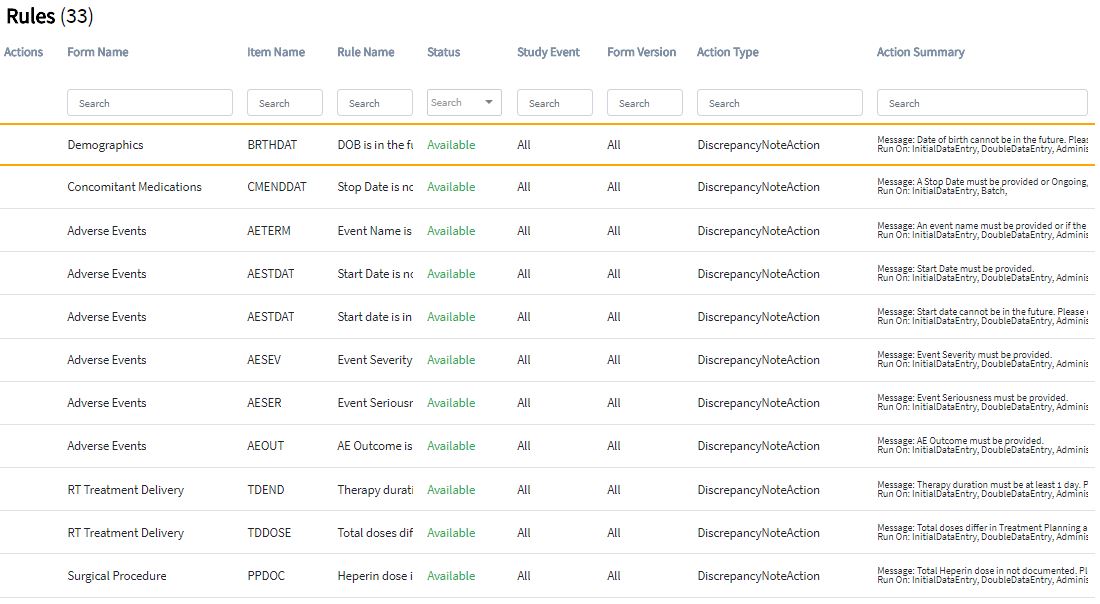
- Click the Actions icon to select the action to be performed.
The following actions can be performed on Rules:
| Action | Description |
|---|---|
| Manage | Displays and manages all rules metadata associated with a target Item Name. |
| Edit | Changes the rule definition, using the rules designer. |
| Test | Tests a rule. |
| Run | Runs a rule. |
| Download | Downloads a rule in XML. |
| Disable Enable |
Disables or Enables a rule. |
| Delete | Deletes a rule from the study build. This action is not recoverable. |
The More Menu includes:
- More Columns displays: Subject Assignment and Default.
- Import Rules from an XML rules definition file.
- Test Rules.
- Export exports the filtered groups list to CSV or ODM XML.
Note:
- You can filter the rules list. The list will filter to include those matching the entered characters. To re-display the whole list, remove the characters in the filter boxes.
3.5.1.Add Rule
Build Steps:
To publish a form:
- Click Forms in the Left Menu.
- Locate the relevant form in the list, if necessary using the filtering and sorting features.
- Click the Actions icon, then from the dropdown, click Publish.
- On the Publish Form page, you can set a different version; this is recommended to indicate your changes are significant. Then click Publish.
- A message will indicate whether or not the publish operation was successful.
If the form fails to publish, the following occurs:
- An email is sent, reporting that the form that failed to publish.
- The error from Captivate Live is displayed.
Note:
- You cannot change the form version using a mass publish action. In a mass publish action, the major version string is unchanged and the minor version will be incremented.
Once a form is published, it can be unpublished to remove it from Captivate Live. To unpublish a form:
- Click Forms in the Left Menu.
- Locate the relevant form in the list, if necessary using the filtering and sorting features.
- Click the Actions icon, then from the dropdown, click Unpublish.
- Click Unpublish again i the popup to confirm that you want to remove the form from Captivate Live.
- If the CRF has associated clinical data, a similar pop-up window is displayed. It gives you the option to Force Delete the clinical data, or keep it. This operation is not reversible. If you are unsure, click Keep Data.
- When the form is successfully unpublished, its status reverts to Draft.
Once events, with their associated forms are created, rules ensure the validity of the data entered. The Rules designer simplifies the creation and modification of rules, using an intuitive drag-and-drop graphical user interface. Another way to define rules is using the XML programming language, which is more suited to create a lot of rules or making massive changes. Once defined in XML, rules can be imported in Captivate Build.
3.5.1.1.Rules Designer
To access the Rules designer:
- Click Rules in the left menu
- Click the + icon in the Rules page.
- The Rules designer interface is a sophisticated, yet intuitive, drag-and-drop interface that includes the following five areas:
- Header – The header displays the Captivate logo and the study name.
- Data Panel – The Data Panel features the different types of data that can be dragged and dropped into the Expression Builder. The types of data include: Text, Number, Date, Current date, Empty. You can also drag-and-drop CRF items for a selected study. As you navigate through the information path of a study: Study, Event, CRF, CRF version and CRF item, you will notice a “bread crumb” at the bottom of the Data Panel showing your current path. Click on any part of this bread crumb to navigate back one or more levels inside your path.
- Operators Panel – The Operators Panel consists of four tool boxes: Group, Compare, Calculate, and Condition. Each tool box contains icons that can be dragged to build the rule’s expression.
- Expression Builder – The Expression Builder area allows you to design or modify your rules. A rule is composed of data items, selected from the Data Panel, and various operators chosen from the Operators Panel. As you drop an item into the Expression Builder, Rules Studio tries to anticipate your next action and displays the next type of item in a box with dotted lines.
- Parameters Panel – This panel allows you to specify the rules parameters. In particular, the rule description, the rule target, which is the CRF item to attach the rule to, and the type of action implemented in response to a rule evaluating to either true or false. After designing a rule, you can verify that the rule is correctly specified by clicking the Validate Rule button.
3.5.1.2.Designing Rules
To design rules:
- Click Rules in the left menu
- Click the + icon in the Rules page.
- In the Data Panel:
- Click on the desired CRF.
- Click on the desired CRF version.
- Locate the data item you want to insert into the expression.
- Drag-and-drop it into the Expression Builder.
- Drag-and-drop an operation, for example Calculate, from the Operators Panel into the Expression Builder.
- Continue building your expression until it is complete.
- Then, complete the following:
| Filed | Description |
|---|---|
| Rule name | Specify a name for the rule. |
| Target this rule to | Specify the CRF item(s) to apply the rule to. You can drag-and-drop CRF items to this field. Multiple targets can be selected. To replace a target, drop another target on it. |
| If the rule evaluates to | Specify the true/false parameter for the rule. |
| Execute the rule upon | Determines when the rule should be run. You can select one or more of the following:
|
| Take the following action(s) | Specify the action that should happen when the rule parameters are met. You can select one of the following:
|
- If you selected Create discrepancy, type the Discrepancy text that should display.
- If you selected Send email, specify an Email to address and Email message.
- If you selected Insert data, specify drag-and-drop a CRF Item and specify a Value.
- If you selected Show CRF Item, type a Message and drag-and-drop a Destination.
- If you selected Hide CRF Item, drag-and-drop a Destination.
- Click Validate Rule.
3.5.2.Manage Rule
To manage a rule:
- Click Rulesin the Left Menu.
- Locate the relevant group in the list, if necessary using the filtering and sorting features.
- Click the Actions icon, then from the dropdown, click Manage.
- A similar page open.

| Icon | Description |
|---|---|
| Run– Runs the rule | |
| Disable – Disables the rule. | |
| Test – Tests the rule. |
3.5.3.Import Rules
To import rules:
- Click Rules in the Left Menu.
- Click Import Rules in the More Menu.
- Two templates are provided. To download an XML template, click one of the following links:
- All actions (with comments)
- All actions (without comments)
- Click the Import Rules button.

- Click Continue.
- Validate the rules.
- Save the rules.
3.5.4.Edit Rule
To edit a rule:
- Click Rules in the Left Menu.
- Locate the relevant rule in the list, if necessary using the filtering and sorting features.
- Click the Actions icon, then from the dropdown, click Edit.
- The rule is loaded in the rule designer. See section Designing Rules for details.
3.5.5.Test Rule
A rule can be manually tested to ensure its proper functioning.
To test a rule:
- Click Rules in the Left Menu.
- Locate the relevant rule in the list, if necessary using the filtering and sorting features.
- Click the Actions icon, then from the dropdown, click Test.
- A similar page is displayed.
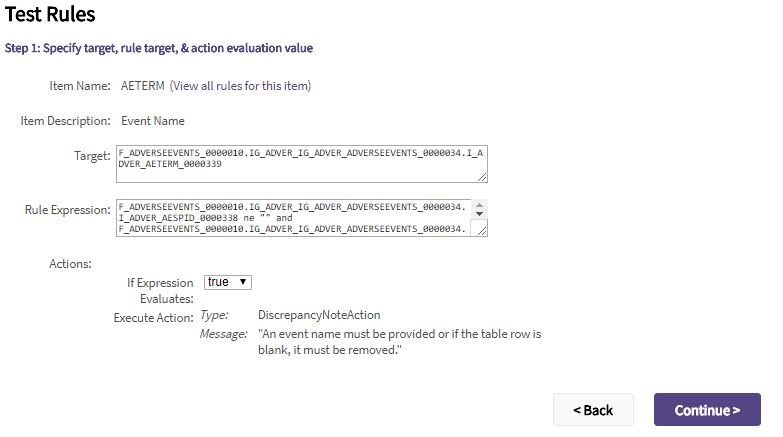
- Review the Target, the Rule Expression to test, and whether the expression evaluates to true or false.
- Click Continue.
- A similar page is displayed.
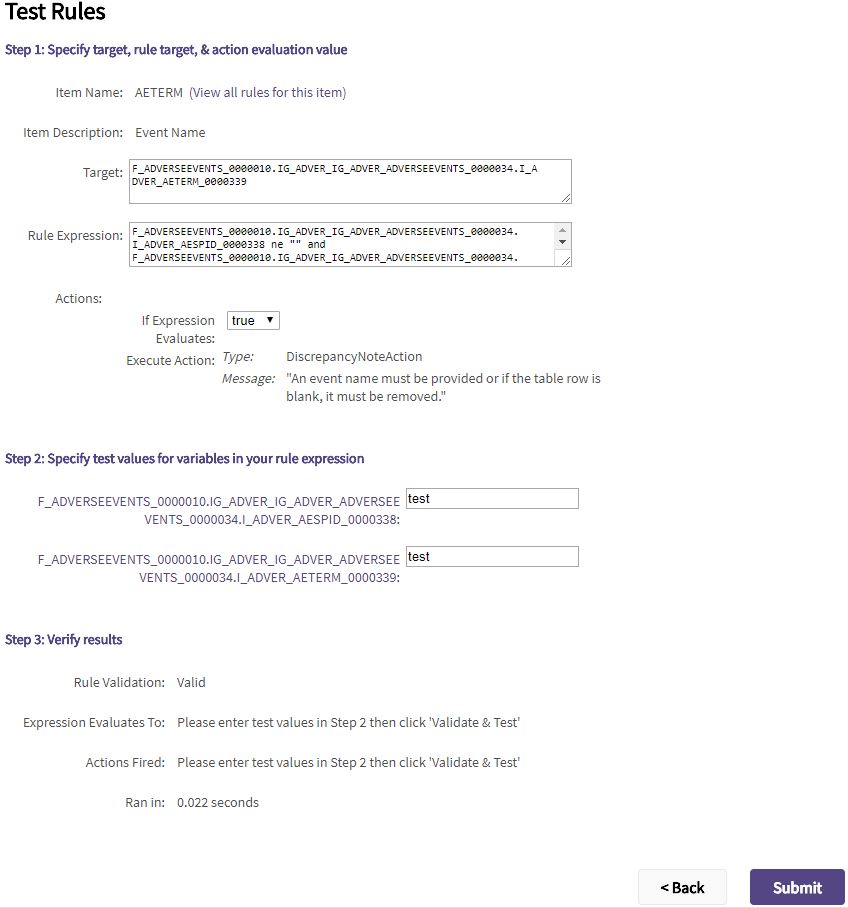
- Enter the test values for the different variables for the rule.
- Click Submit.
- The Verify Results panel summarizes the results of the test, and identifies whether or not the rule is valid. If it is invalid, a diagnostic message in the Alerts & Messages panel will display. If the rule is valid, it executes with the test parameters you supplied and the execution results are shown. Whether or not the specified action is triggered is indicated, along with the execution time.
3.5.6.Run Rule
To run a rule:
- Click Rules in the Left Menu.
- Locate the relevant rule in the list, if necessary using the filtering and sorting features.
- Click the Actions icon, then from the dropdown, click Run.
- A report for the executed rules is displayed.
- Review it, then click Back.
3.5.7.Download Rule
To download a rule:
- Click Rules in the Left Menu.
- Locate the relevant rule in the list, if necessary using the filtering and sorting features.
- Click the Actions icon, then from the dropdown, click Download.
- The rule is downloaded in your download folder.
3.5.8.Disable and Enable Rule
Disabling a rule prevents it from executing. To disable a rule:
- Click Rules in the Left Menu.
- Locate the relevant rule in the list, if necessary using the filtering and sorting features.
- Click the Actions icon, then from the dropdown, click Disable.
- Click Disable in the popup to confirm that you want to disable the rule, or Cancel to cancel.
- The rule is now disabled.
Note:
- To disable a rule, its status must be Available.
Enabling a rule reverses its disabled status. To enable a rule:
- Click Rules in the Left Menu.
- Locate the relevant event in the list, if necessary using the filtering feature.
- Click the Actions icon, then from the dropdown, click Enable.
- The rule status is now Available.
Note:
- To enable an rule, its status must be Disabled.
3.5.9.Delete Rule
To delete a rule
- Click Rules in the Left Menu.
- Locate the relevant rule in the list, if necessary using the filtering and sorting features.
- Click the Actions icon, then from the dropdown, click Delete.
- Click Delete to confirm that you want to delete the rule.
- The rule is removed from the list.
Note:
- Delete is not a recoverable action.
3.6.Sites
To manage sites:
- From the Left menu, click Sites.
- A similar page is displayed.
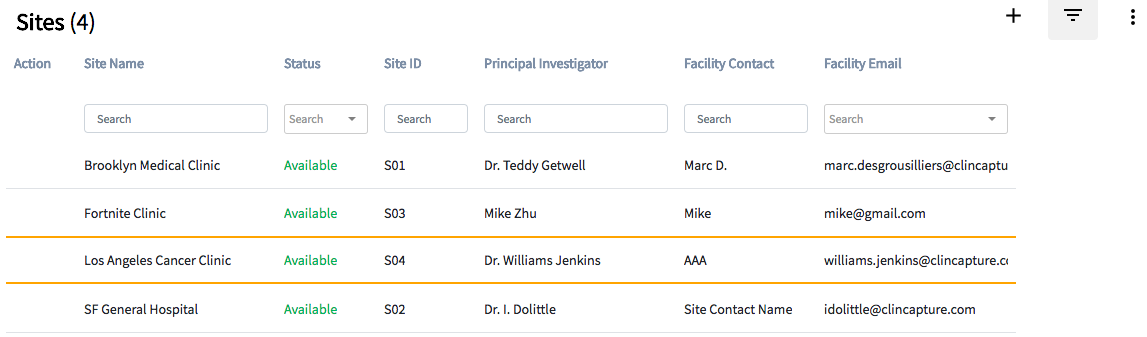
- Click the Actions icon to select the action to be performed.
The following actions can be performed on Sites:
| Action | Description |
|---|---|
| View | Displays the site metadata. |
| Edit | Changes the site configuration, including site name, site ID, etc. |
| Disable
Enable |
Removes or restores the site. |
| Lock
Unlock |
Locks or unlocks data access for a site. |
The More Menu includes:
- More Columns displays: Site OID, Facility Phone, Name, Site, Country, Start Date, Expected End Date, Expected Enrollment.
- Export exports the filtered sites list.
Notes:
- You can filter the sites list. The list will filter to include those matching the entered characters. To re-display the whole list, remove the characters in the filter boxes.
3.6.1.Add Site
Build Steps:
Add a StudyAdd FormsDeploy StudyPublish FormsAdd EventsAdd GroupsAdd Rules- Add Sites
- Add Users
To add a site:
- Click Sites in the Left Menu
- Click the + icon in the Sites page.
- Complete the following. Required fields are marked with an asterisk.
| Field | Description |
|---|---|
| Parent Study | The name of the study currently being built. This is a read-only field. |
| Site Name * | Enter the site name. The site name must be unique. |
| Unique Protocol ID * | Enter the protocol ID. The protocol ID must be unique. |
| Secondary IDs (separated by commas) | Secondary IDs for the site. Separate entries by commas. |
| Principal Investigator * | Enter the name of the principal investigator, using up to 100 characters. |
| Brief Summary | A brief summary of the site, using up to 2000 characters. |
| Protocol Verification/IRB Approval Date | Enter the date of protocol verification/Institutional Review Board approval. Click the calendar icon to select a date. |
| Start Date | The start date for the site in this study. Click the calendar icon to select a date. |
| Estimated Completion Date | The estimated completion date for the site in this study. Click the calendar icon to select a date. |
| Expected total enrollment * | The total number of subjects expected to be enrolled at the site for this study. This value is for reporting purposes only; you can enroll a greater number or fewer number of subjects. |
| Facility Name | The facility name. |
| Facility City | The facility city. |
| Facility State/Province | The facility state/province. |
| Facility ZIP | The facility ZIP code. |
| Facility Country | The country in which the facility is located. |
| Facility Contact Name | The name of the contact person at the facility. |
| Facility Contact Degree | The degree(s) held by the contact person at the facility. |
| Facility Contact Phone | The phone number of the contact person at the facility. |
| Facility Contact Email * | The email address of the contact person at the facility. |
| Site Status for this study * | The status of the site: pending, available, frozen, or locked. The site status will be set depending on the study status. Note: This field is system-maintained and cannot be changed when the site is created. |
| Collect Person ID? | Using a person ID allows a unique identifier to be assigned to a subject, which follows the subject across all Captivate sites and studies they participate in.
|
| Collect Interviewer Name? | Select one of the following:
|
| Interviewer Name Default | If you are collecting the interviewer name on CRFs at the site, select one of the following:
|
| Collect Interview Date? | Select one of the following:
|
| Interview Date Default | If you are collecting the interviewer date on CRFs at the site, select one of the following:
|
| Mark imported CRF as Completed? | Captivate allows you to import Event CRF data from a file, using the web services interface, as an alternative to performing data entry. For example, when data is captured using a system other than ClinCapture. Select Yes if CRFs should be marked as complete when the data is imported from an outside system. |
- Optionally, update the Site Event Definitions for the site which include the CRF configuration options for the site. For example if a site enters data from source documents, the CRFs may be configured for double data entry with the highest level of data monitoring, whereas other sites entering data in real-time may not be required to do so. See Managing Sites for details.
- Click Continue.
- Review the Site to be defined.
- If you’re satisfied, click Submit.
Repeat this process until all the required sites are created.
3.6.2.View Site
To view a site:
- Click Sites in the Left Menu.
- Locate the relevant site in the list, if necessary using the filtering and sorting features.
- Click the Actions icon, then from the dropdown, click View.
- The site metadata page is displayed but you cannot make any changes to it.
- When you’re done viewing the site, click Back.
3.6.3.Edit Site
To edit a site:
- Click Sites in the Left Menu.
- Locate the relevant site in the list, if necessary using the filtering and sorting features.
- Click the Actions icon, then from the dropdown, click Edit.
- Make any necessary changes to the site properties. Required fields are marked with a red asterisk. See section Add Site for the configurable properties.
- When you’re done editing the site, click Submit.
3.6.4.Lock and Unlock Site
Locking a site makes it unable to enter data or perform any other operations on the clinical data, except view. To lock a site, its status must be Available:
- Click Sites in the Left Menu.
- Locate the relevant site in the list, if necessary using the filtering and sorting features.
- Click the Actions icon, then from the dropdown, click Lock.
- Click Submit to confirm that you want to lock the site, or Back to cancel.
- The site is now locked.
Unlocking a site reverses its Locked status. To unlock a site, its status must be Locked:
- Click Sites in the Left Menu.
- Locate the relevant site in the list, if necessary using the filtering and sorting features.
- Click the Actions icon, then from the dropdown, click Unlock.
- Click Submit to confirm that you want to enable the site, or Back to cancel.
- The site is now unlocked.
3.6.5.Disable and Enable Site
Disabling a site removes it from the study/site selection dropdown. To disable a site:
- Click Sites in the Left Menu.
- Locate the relevant site in the list, if necessary using the filtering and sorting features.
- Click the Actions icon, then from the dropdown, click Disable.
- Click Submit to confirm that you want to disable the site, or Back to cancel.
- Click Yes in the confirmation pop-up.
- The site is now disabled.
Note:
- To disable a site, its status must be Available.
Enabling a site reverses its disabled status. To enable a site:
- Click Sites in the Left Menu.
- Locate the relevant site in the list, if necessary using the filtering feature.
- Click the Actions icon, then from the dropdown, click Enable.
- Click Submit to confirm that you want to enable the site, or Back to cancel.
- Click Yes in the confirmation pop-up.
- The site status is now Available.
Note:
- To enable a site, its status must be Disabled.
3.7.Users
Each user must be assigned a User Role that relates to the clinical research tasks they perform in that particular study or site. The User Role determines the scope of features a user can access. Please see Sections User Roles and User Permissions for details.
To manage users:
- From the Left menu, click Users.
- A similar page is displayed.

- Click the Actions icon to select the action to be performed.
The following actions can be performed on Users:
| Action | Description |
|---|---|
| View | Displays the site metadata. |
| Edit | Changes the site configuration, including site name, site ID, etc. |
| Add Role | Adds a new role. Once added, roles can be disabled and deleted using:
To manage a role, expand the user’s tree view, click the Action icon for the desired role and select the appropriate action. |
| Lock/Unlock | Locks and unlocks a user account. |
The More Menu includes:
- More Columns displays: Company Name, Phone Number, and SOAP Access.
- Audit Logins allows you to monitor login attempts.
- Security Policies are used to set the login and password policies.
- Export exports the filtered users list.
Notes:
- Click the black triangle icon in the User Role column to display all the roles associated with a user.
- Note that if a user has a role in the current study, all the roles, even those in a different study are displayed. This is to accurately report all the roles associated with a user.
- You can filter the users list. The list will filter to include those matching the entered characters. To re-display the whole list, remove the characters in the filter boxes.
3.7.1.User Roles
User Roles in Captivate are based on the roles typically found in clinical trials or and other forms of clinical research.
The following user roles exist in Captivate:
- System Administrator
- Study Administrator
- Study Monitor
- Study Coder
- Study Evaluator
- Study Sponsor
- Site Monitor
- Investigator
- Clinical Research Coordinator
The User Role determines the features a user can access within a particular study or site.
The User Roles available at the study level are different from those available at the site level. This is because the features accessible at the study level are different from those accessible at the site level. A user can be simultaneously assigned to multiple studies and sites with different roles.
This table maps the user roles and the user level.
| User Role | Level |
|---|---|
| System Administrator | System level |
| Study Administrator | Study level |
| Study Monitor | Study level |
| Study Coder | Study level |
| Study Evaluator | Study level |
| Study Sponsor | Study level |
| Site Monitor | Site level |
| Clinical Research Coordinator | Site level |
| Investigator | Site level |
3.7.2.User Permissions
As mentioned previously, the features available to a user depend on his or her user role. If a user does not have permission to use a feature for a specific role, then Captivate either does not present it as an option on the user interface, or disables the option on screen.
The table below summarizes the features and permissions available to the user roles at the study level:
| User Role | Modules and Main Features Available |
|---|---|
| Study Administrator | Submit Data:
Monitor and Manage Data:
Extract Data:
Administration:
Other:
|
| Study Monitor | Monitor and Manage Data:
Extract Data:
Other:
|
| Study Coder | Monitor and Manage Data:
Other:
|
| Study Evaluator | Monitor and Manage Data:
Other:
|
The table below summarizes the features and permissions available to the user roles at the site level:
| User Role | Modules and Main Features Available |
|---|---|
| Site Monitor | Monitor and Manage Data:
Extract Data:
Other:
|
| Investigator | Submit Data:
Monitor and Manage Data:
Extract Data:
Other:
|
| Clinical Research Coordinator | Submit Data:
Other:
|
3.7.3.Users Restrictions
Captivate also implements additional access restrictions to features in various modules. These are outlined in the tables below.
3.7.3.1.Module: Submit Data
The table below details the access restrictions for the ‘Submit Data’ module:
| Action to be Performed | User Role Restriction | User Role Affected |
|---|---|---|
| Access Submit Data module | Role Cannot be |
|
| Remove or Restore a subject from study | Role Cannot be |
|
| Assign subject to another site within same study | Role Must be |
|
| Remove or Restore Study Event CRF’s | Role Must be |
|
| Remove, Restore or Delete Study Events | Role Must be |
|
| Delete Study Event CRF’s | Role Must be |
|
| Set Study Event Status to “locked” | Role Must be |
|
| Set Discrepancy Note status to “closed” | Role Must be |
|
3.7.3.2.Module: Monitor and Manage Data
To access the ‘Monitor and Manage Data’ module, your User Role must Study Administrator, Study or Site Monitor, Study Coder, Study Evaluator. Further, the restrictions below also apply to user roles within this module:
| User Role | Features | Notes |
|---|---|---|
| Study or Site Monitor | Subject Matrix | Can only view. Editing not allowed |
| View Events | Can only view. Editing not allowed | |
| Source Data Verification | No restrictions | |
| Study Audit Log | No restrictions | |
| Notes and Discrepancies | Can create a Discrepancy Note of type ‘Query’ Can update or close existing Discrepancy Note | |
| Study Administrator | Source Data Verification | No restrictions |
| Study Audit Log | No restrictions | |
| Code | Visible only if coding is enabled | |
| Evaluate CRF | Visible only if evaluation is enabled | |
| Study Coder or Study Evaluator | Notes and Discrepancies | Can create a Discrepancy Note of type ‘Query’ Can only view, update or close existing Discrepancy Note they created. |
3.7.3.3.Module: Extract Data
The table below details the access restrictions for the ‘Extract Data’ module:
| Action to be Performed | User Role Restriction | User Role Affected |
|---|---|---|
| Access this module | Role Cannot be |
|
| Delete, remove or restore “Dataset Definitions” that you did not create | Role Must be |
|
3.7.3.4.Module: Administration
To access the Administration module, the User Role must be Study Administrator.
| Action to be Performed | User Role Restriction | User Role Affected |
|---|---|---|
| Access this module | Role Must be |
|
3.7.4.Add User
Build Steps:
To add a user:
- Click Users in the Left Menu
- Click the + icon in the Users page.
- A similar page opens.
- Complete the following or click the View icon next to the email field to search the LDAP directory. Required fields are marked with an asterisk.
Field Description Email* Enter the user’s email address. Company Name* Enter the user’s company name or institutional affiliation. First Name* Enter the user’s first name. Last Name* Enter the user’s last name. Company Name* Enter the user’s company name or institutional affiliation. Phone Enter the user’s phone number. Special characters: +, (, ), -, and spaces are allowed Time Zone Select the user’s local time zone. Assigned Study/Site* Select the study or site to be assigned to the user. User Role* Select the user role for assigned study or site. - Study roles:
- Study Sponsor
- Study Administrator
- Study Monitor
- Study Coder
- Study Evaluator
- Site roles:
- Site Monitor
- Investigator
- Clinical Research Coordinator
Authorize SOAP Access* Check the box if the user will programmatically interface with Captivate using SOAP services - Study roles:
- Click Submit.
Notes:
- The user will receive an email containing the link to the study and his credentials.
- When site level users (Clinical Research Coordinators or Site Monitors) are created in Captivate, the Study Administrator has the option to mask, or hide, one or more CRFs from the user. When a CRF is masked, the user cannot take any action on the masked CRFs, i.e., the CRF is hidden from the user. Masking is disabled for users with a role of Investigator. Masking is enforced according to the role used to access a site.
Repeat this process until all the study/site users have been added.
3.7.5.View User
To view a user:
- Click Users in the Left Menu.
- Locate the relevant user in the list, if necessary using the filtering and sorting features.
- Click the Actions icon, then from the dropdown, click View.
- The user metadata page is displayed but you cannot make any changes to it.
- When you’re done viewing the user, click Back.
3.7.6.Edit User
To edit a user:
- Click Users in the Left Menu.
- Locate the relevant user in the list, if necessary using the filtering and sorting features.
- Click the Actions icon, then from the dropdown, click Edit.
- Make any necessary changes to the user properties. Required fields are marked with a red asterisk. See Section Add User for the configurable properties.
- When you’re done editing the user, click Continue.
- In the confirmation page, click Submit.
CRFs can be masked for Clinical Research Coordinators and Site Monitors. When a CRF is masked, the form is visible but the user cannot act on it.
To mask a CRF:
- Edit the user using steps 1 thru 3 in the procedure above.
- Click CRFs Masking.
- The list of studies and sites the user has access to is displayed. Open the desired site.
- The list of CRF is displayed by events. Click Yes for the CRFs to be masked
- Click Submit.
- Continue with steps 4 thru 6 in the procedure above.
Note:
- Masking is not available for Investigator users as this role is responsible for clinical records completeness and correctness.
3.7.7.Lock and Unlock User
Locking a user prevents him logging in the study. To lock a user:
- Click Users in the Left Menu.
- Locate the relevant user in the list, if necessary using the filtering and sorting features.
- Click the Actions icon, then from the dropdown, click Lock.
- Click Lock to confirm that you want to lock the user, or Cancel to cancel..
- The user is now locked.
Note:
- To lock a user, its status must be Available.
Unlocking a user reverses its locked status. To unlock a user:
- Click Users in the Left Menu.
- Locate the relevant user in the list, if necessary using the filtering feature.
- Click the Actions icon, then from the dropdown, click Unlock.
- The user status is now Available.
Note:
- To lock a user, its status must be Locked.
3.7.8.Add Role
- Click Users in the Left Menu.
- Locate the relevant user in the list, if necessary using the filtering and sorting features.
- Click the Actions icon, then from the dropdown, click Add Role.
- Assign a new role to the user, then click Submit.
3.7.9.Lock and Unlock Role
Locking a role prevents a user from accessing it after logging in. To lock a role:
- Click Users in the Left Menu.
- Locate the relevant user in the list, if necessary using the filtering and sorting features.
- Open the user tree view to display all the roles.
- Click the Actions icon for the role you want to lock, then from the dropdown, click Lock Role.
- Click Lock in the popup to confirm that you want to lock the role, or Cancel to cancel.
- The role is now locked.
Note:
- To lock a role, the user status must be Available.
Unlocking a role reverses its locked status. To unlock a role:
- Click Users in the Left Menu.
- Locate the relevant user in the list, if necessary using the filtering and sorting features.
- Open the user tree view to display all the roles.
- Click the Actions icon for the role you want to unlock, then from the dropdown, click Unlock Role.
- The role status is now Available.
Note:
- To unlock a role, its status must be Locked.
3.7.10.Delete Role
Deleting a role permanently removes it. To delete a role:
- Click Users in the Left Menu.
- Locate the relevant user in the list, if necessary using the filtering and sorting features.
- Open the user tree view to display all the roles.
- Click the Actions icon for the role you want to disable, then from the dropdown, click Delete Role.
- Click Delete in the popup to confirm that you want to delete the role, or Cancel to cancel.
- The role is now deleted.
Note:
- The last role cannot be deleted. The user must have at least one role. Consider disabling it instead
4.Going Live
Going “Live” involves the following steps:
- Performing User Acceptance Testing for the study build in the @Test environment
- Promoting the study build to the production environment
- Selecting the production environment and adding the sites and users
4.1.User Acceptance Testing
It is recommended to perform User Acceptance Testing in the test environment. This method avoids test data in production and, if any issues are found, they can be readily fixed without requiring a change to the production build.
To execute User Acceptance Testing:
- Add test sites and user. See Sections Add Site for details.
- Add users. These users should be the actual site users, however, their role should be defined in the test environment. When the study goes live, we will add a role in the production environment.
- Test the build functionality against these business requirements:
All user names are correct Subject panel info is correct All event names are correct All CRF names are correct All Events have the right CRFs Calendared Events are correctly scheduled (if used) eCRF conforms to design Saving data is possible in all CRFs Correct data entered in all unique CRFs All field checks activated at least once All rules activated at least once (if used) Administrative editing tested Double data entry capability tested (if used) Query capability tested Signing capability tested Export capability tested Data exported compared to online pages Data import capability tested (if used)
4.2.Build Promotion
To promote a build:
- Click Promote in the Left Menu.
- A similar page opens
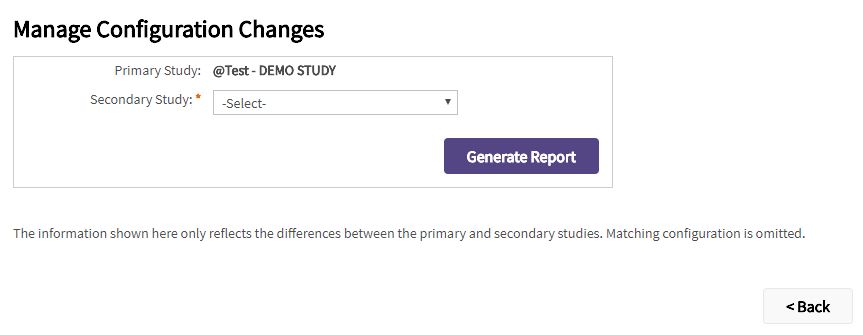
- Select a secondary study. This is the study to promote the changes to.
- Click Generate Report to get a report on the build changes to be promoted.
- A report will be generated within a few seconds. The report can be filtered, sorted and a page size can be specified. In addition, it can be exporte by clicking the Excel icon next to the Generate Report button. A change report contains information related to the following build items:
- Studies
- Events
- Event CRFs
- Rules
- Groups
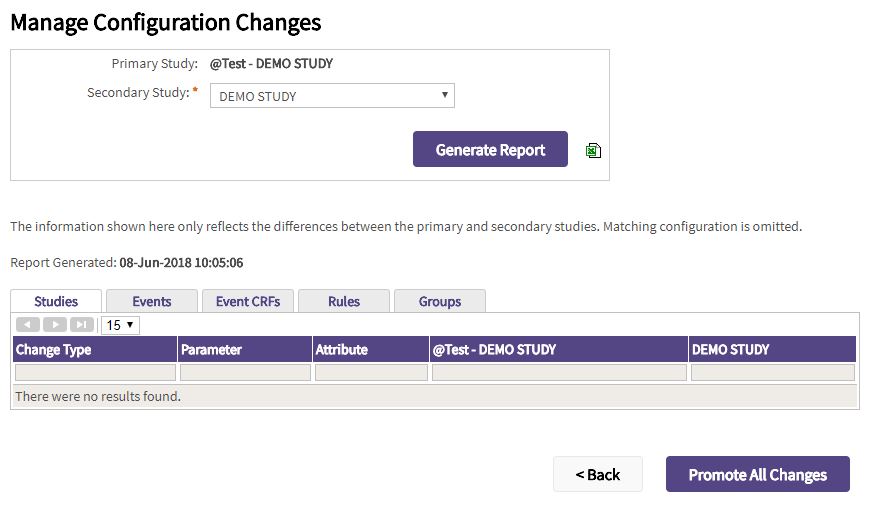
- Review the changes to be promoted.
- There are 2 ways to promote changes.
- Promote all the changes at once by clicking Promote All Changes.
- Select the changes you want to promote by checking the box next to the desired change(s) then click Promote Changes.

Notes:
- The change report only shows the build changes between the primary study (the study test environment currently selected) and the secondary study.
- The secondary study may be the same study production environment or it may be another study test environment.
4.2.1.Promote Studies
The studies report lists the differences between study options. A similar report will be generated.

Notes:
- There will be no differences reported between the test and the production environments for the same study.
- If the secondary study is another study, these changes cannot be promoted. Select the secondary study in the Captivate Build header and edit the study options.
4.2.2.Promote Events
A similar report will be generated in the Events tab.
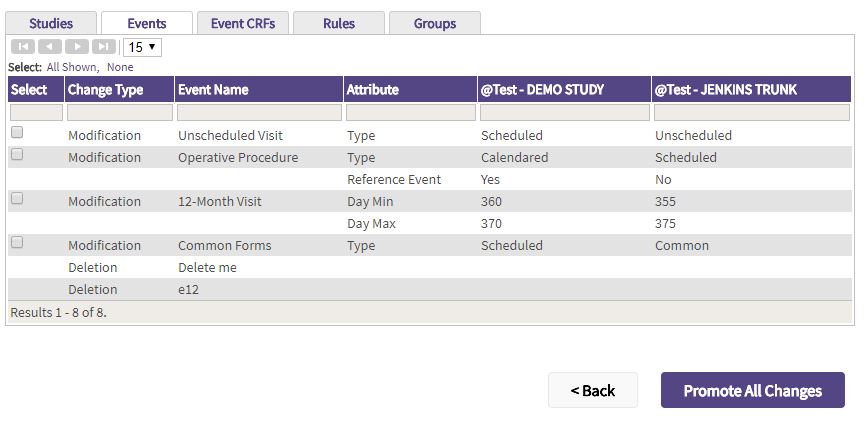
Notes:
- Event deletion is promoted only if the event does not have any associated clinical data.
- If an event has any attached CRFs or if its is status is not not started in Captivate Live’s Subject Matrix, it will not be deleted.
- To delete attached CRFs, select the secondary study in the Captivate Build’s header and edit the event to be deleted.
- To find scheduled events, open Captivate Live and filter the event for the scheduled state in the Subject Matrix.
4.2.3.Promote Event CRFs
A similar report will be generated in the Event CRFs tab.

Notes:
- Only differences between configurations are reported for Event CRFs; that is, differences in their layout or content are not reported.
- Event CRF deletion is promoted only if the CRF does not have any associated clinical data.
- To locate CRFs with clinical data:
- Select the secondary study in the Captivate Build Header
- Click Forms in the Left Menu, then select View Details for the form to be deleted.
- The CRF Links page opens, click the Links icon to display Subjects linked to the form.
- Click Open Live in the Left Menu and click Subject Matrix in the Captivate Live Tasks Menu.
- Filter for the relevant subject IDs and delete the CRF associated with the event. If the CRF is associated with multiple events, make sure to delete the CRF for the proper event. CRF deletions are not recoverable.
- Item-level SDV settings will be reported in a future release.
4.2.4.Promote Rules
A similar report will be generated in the Rules tab.
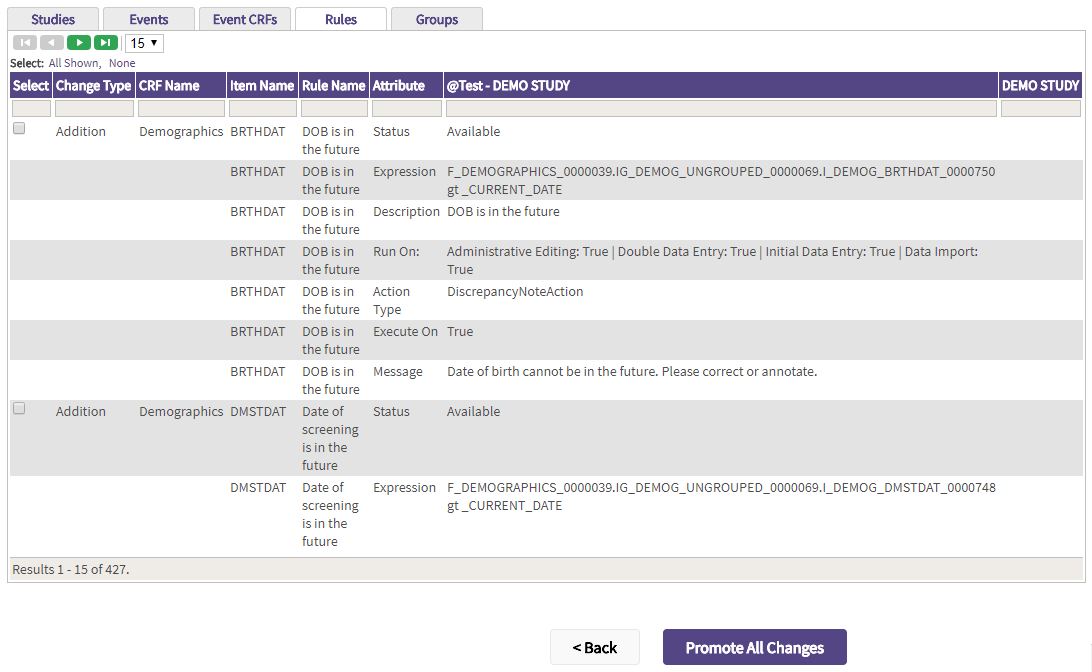
Note:
- Since Captivate Build allows duplicate rule names, rules are considered to be similar if they share the same name and target(s).
4.2.5.Promote Groups
A similar report will be generated in the Groups tab.
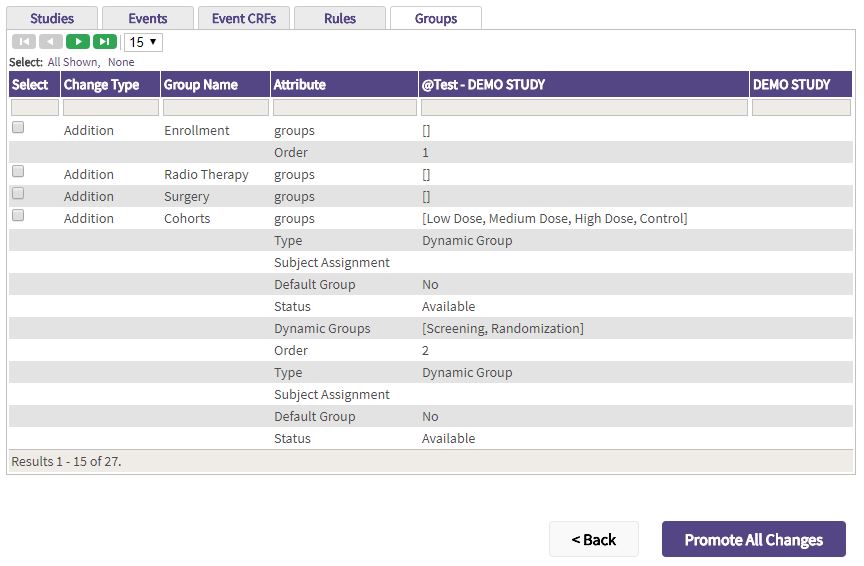
Note:
- Promote events before promoting any Dynamic Groups.
4.3.Complete Production Build
To complete the production build:
- Select the production study.
- Add the production sites. Click Sites in the Left Menu then the + icon. See Section Add Site for details.
- Add roles in the production environment for UAT users, and/or add new users. See Sections Add Role and Add User for details.
5.Getting Help
Many resources are available to help you be successful using Captivate:
- User Guides
- Free Training
- Contact Us
- FAQs
5.1.User Guides
To view the Captivate User’s Guides:
- Click Help in the Left Menu.
- Click User Guide in the Help Menu.
- In the submenu, select Build to open the current, most up-to-date version of the Captivate Build User’s Guide.
-or –
- In the submenu, select Live to open the current, most up-to-date version of the Captivate Live User’s Guide.
Note:
- You can save or print the User Guide(s) as needed.
5.2.Training
Certified training is provided free of charge, and certificates are provided to attendees upon successful quiz completion. Certified users are entitled to free support in North America.
To view the current training curriculum and schedule:
- Click Help in the Left Menu.
- Click Training in the Help Menu, the training page opens.
- Review the training schedule and enroll.
5.3.Contact Us
To contact us:
- Click Help in the Left Menu.
- Click Contact Us in the Help Menu,
- Fill out the provided form and click Submit.
- One of our Customer Success team members will be in touch with you shortly.
Note:
- You may also call (800) 987-6007.
5.4.Browsing FAQs
To browse Frequently Asked Questions:
- Click Help in the Left Menu.
- Click FAQs in the Help Menu,
- View the FAQs to learn more about our plans, study build, compliance, security, etc. The questions are grouped by topic. To open a group, simply click the group heading.