Build Steps
Add Study- Add Forms
- Deploy Study
- Add Events
- Add Groups (optional step)
- Add Rules (optional step)
- Add Sites
- Add Users
To add a form:
- Click Forms in the left menu
- Click the + icon in the Forms page.
- Complete the form configuration. All fields are editable and required fields are marked with a red asterisk.
| Field | Description |
|---|---|
| Form Type | Select Normal or Randomization. The Randomization type form allows you define stratification variables and randomize subjects. |
| Enforce SAS naming restrictions | If the form data is expected to be manipulated in SAS, click the Enforce SAS naming convention checkbox. This will enforce the SAS 9.2 naming conventions for the form name, the CRF Item Name, the Table Name, the Reporting Label and the Option Names and Values as follows:
|
| Form Name * | The form name. The form name can be changed at anytime. |
| Version * | Enter a major version identifier for the form. It can be a number or a text string, for example “test”. The system will add .0 (a minor identifier) to your version identifier. It will increment the minor version identifier, for example .1, .2, .3, etc., as you iterate publishing and editing the form. Older form versions can be deleted, as long as they are not linked to clinical data or rules. |
| Brief Description * | A description of the form, using up to 2000 characters. |
| Comments * | Any informational comments you wish to add. |
- Click Continue to configure the form options.
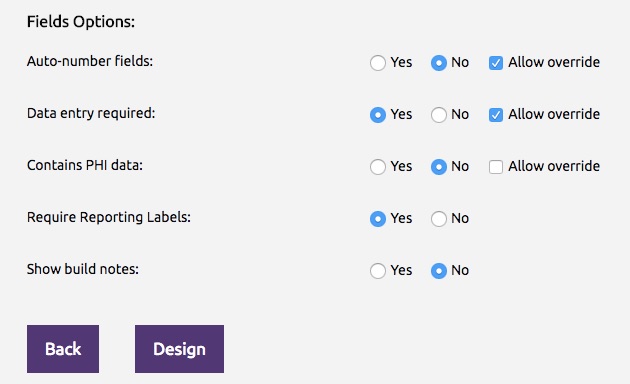
- Configure the form options These options control the behavior and display of the following parameters in the configuration panel.
| Field | Description |
|---|---|
| Auto-number fields | Select Yes if the form contains auto-numbered items, or select No if the form does not contain auto-numbered items. Note: Check the box Allow override to allow the default value to be changed while designing the form. |
| Data entry required | Select Yes if data entry is required for all the items on this form, or select No if data entry is not required. Note: Check the box Allow override to allow the default value to be changed while designing the form. |
| Contains PHI data | Select Yes if the form contains Protected Health Information (PHI) data, or select No if the form does not contain PHI data. Note: Check the box Allow override to allow the default value to be changed while designing the form. |
| Require Reporting Labels | Select Yes if a reporting label is required for all items in your form, or select No if reporting label is not required. |
| Show build notes | Select Yes if build notes should be shown in the form designer, or select No if build notes should not be shown. |
- Click Design.
- The form designer opens. See Design Form.
- When you are finished designing your form, click Save & Exit.
Repeat this process until all the forms required in your study protocol have been created.