Build Steps:
Events are a series of site visits or clinical events during which patient data is collected over the course of a study. There are four types of events:
- Scheduled events are expected to occur at a pre-determined schedule, according to the study protocol.
- Unscheduled events do not have a pre-determined schedule. For example, an unexpected office visit.
- eSource events are similar to Scheduled events, but they allow you to collect data in real time. You do not need to collect data on a source document first.
- Common events collect data forms, but they are not expected to be associated with a particular time. Examples might include Protocol Deviations, Concomitant Medications and Adverse Events.
- Calendared events automatically schedule follow-up events based on a reference event, according to intervals set in the study protocol.
To add an event:
- Click Events in the Left Menu
- Click the + icon in the Events page.
- Complete the following. Required fields are marked with an asterisk.
| Field | Description |
|---|---|
| Name * | The name of the event. |
| Description | The description of the event. |
| Type * | Select the event type from the dropdown list: eSource*, Scheduled, Unscheduled, Common, Calendared.* Requires the eSource feature to be enabled. |
| Repeating | If you selected Scheduled, Unscheduled or Common as the event type, select Yes if the event is repeating.Repeating indicates this event can occur multiple times for a subject within the study. |
| Reference Event | If you selected Calendared, complete the following: Reference Event – Check the box if this event is a reference event.If this is not a reference event, complete the following:
|
| Category | Specify a category for the event. The category is generally used to indicate the study phase. For example, Screening, PreTreatment, Treatment, FollowUp. |
- Click Continue.
- Select the CRFs to attach to the event by clicking the corresponding checkboxes.
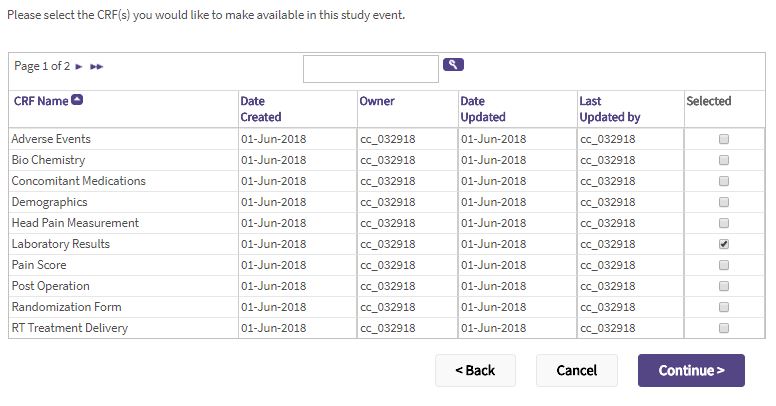
- Click Continue.
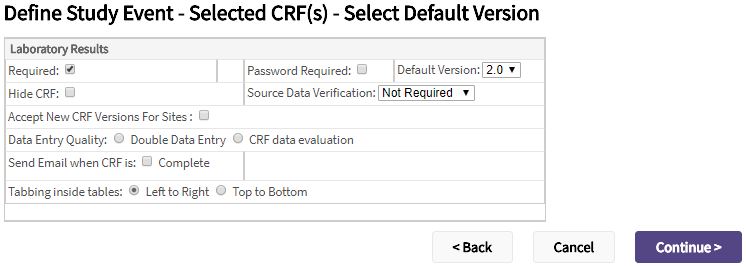
- For each of the selected CRFs, complete the following.
| Field | Description |
|---|---|
| Required | Check the box if the CRF must be completed for the event. |
| Data Entry Quality | Select:
|
| Password Required | Check the box if the user must enter their password to save the data for the CRF. |
| Default Version | If there are more than one version of the CRF, select the version from the dropdown that should default for the event. |
| Accept New CRF Versions For Sites | When this checkbox is checked and a new CRF version is available, sites can be automatically be updated. This function can be disabled on a per-site basis. |
| Hide CRF | Check the box if the CRF should only be viewable at the study level. If this option is selected, sites cannot access the CRF. |
| Source Data Verification | Select how much, if any, of the data on the CRF requires source data verification. You can select:
|
| Send Email when CRF is |
|
| Tabbing inside tables | To control the cursor movement when tabbing inside tables, select:
|
- Click Continue.
- Review the Event to be defined.
- If you’re satisfied, click Submit.
- You can change the order the events will appear on the Subject Matrix by dragging and dropping the events in the order desired.
- You can also change the order of the CRFs attached to an event by dragging and dropping a CRF in the order desired within the same event.
Repeat this process to create all the events with the associated forms, according to your study protocol.
Note:
- Event must be added after deploying a study.